



Setting up a VPN is a wonderful way to safeguard your network while allowing remote access to its resources. WireGuard, noted for its simplicity and efficiency, is an excellent option. This post will show you how to run WireGuard VPN on TrueNAS Scale 24.04 with the TrueNAS Community APP Catalog.
Prerequisites
Before you begin, ensure you have the following:
- Updated TrueNAS Scale System: Ensure your TrueNAS Scale system is updated to version 24.04.
- Access to Your Router/Firewall: You must forward a custom UDP port for WireGuard, set up a DDNS for dynamic IP address update, etc.
- TrueNAS Scale APP Network Configuration: Know your network settings, including interface and gateway details, application > advanced settings > Kubernetes setting: look for interface and route settings.
- TrueNAS Community Catalog: Ensure you have access to the TrueNAS Community Catalog for app installations.
Install and Configure WireGuard (wg-easy)
wg-easy is an easy way to run WireGuard VPN with Web-based Admin UI supported.
1. Search for WireGuard: In the Apps > Discover section, use the search bar to find "wg-easy" and install.

2. Configure WireGuard:
- Start by entering your Hostname or IP: This should be your public static IP address or a domain name that points to your TrueNAS server. By default, WireGuard uses your private IP, but you can update this later in the config file.
- Next, set the Port for Client Configuration: Although the default UDP port is
51820, it’s highly recommended to change it for security reasons. For example, you might use59880or another available port. - Then, create a Password for WebUI: Make sure to choose a strong, unique password to protect your configuration.
- Persistent Keep Alive: Unless you have a reason to change the settings, the default should be okay.
- Device Name: Unless you have a reason to change the settings, the default should be okay.
- Clients MTU: Unless you have a reason to change the settings, the default should be okay.
- However, when setting the Clients IP Address Range: ensure this network is unique within your environment. By default, it’s
10.8.0.x, but you might want to modify it. For instance, I switched mine to10.88.0.xto avoid conflicts. - Moving on, adjust the Client DNS Server: It’s a good idea to replace the default with a reliable public DNS service, such as
1.1.1.1(Cloudflare) or9.9.9.9(Quad9). - In the Allowed IP Entry: no value is entered by default. You’ll need to decide how traffic should route through your VPN. To create a full tunnel (routing all traffic through the TrueNAS server), enter
0.0.0.0/0. Alternatively, for a split tunnel configuration, you can calculate custom routes using this helpful tool: WireGuard AllowedIPs Calculator. - Now, it’s time to configure Additional Environment Variables: If you plan to route internet traffic through the VPN. On the other hand, if your goal is to only access your home network without an internet connection (or using a split tunnel in the client side for internet), you can safely leave these at their default values.
For internet routing, use the following variables:
| WG_POST_UP | iptables -t nat -A POSTROUTING -s 10.88.0.0/24 -o enp11s0 -j MASQUERADE; iptables -A INPUT -p udp -m udp --dport 59880 -j ACCEPT; iptables -A FORWARD -i wg0 -j ACCEPT; iptables -A FORWARD -o wg0 -j ACCEPT; |
| WG_PRE_UP | iptables -t nat -F; iptables -F; |
Important: Before applying these variables, replace enp11s0 with your actual network interface name. You can find this by navigating to Network > Interfaces in the TrueNAS web interface. Additionally, adjust the port number and IP range to match your earlier settings.
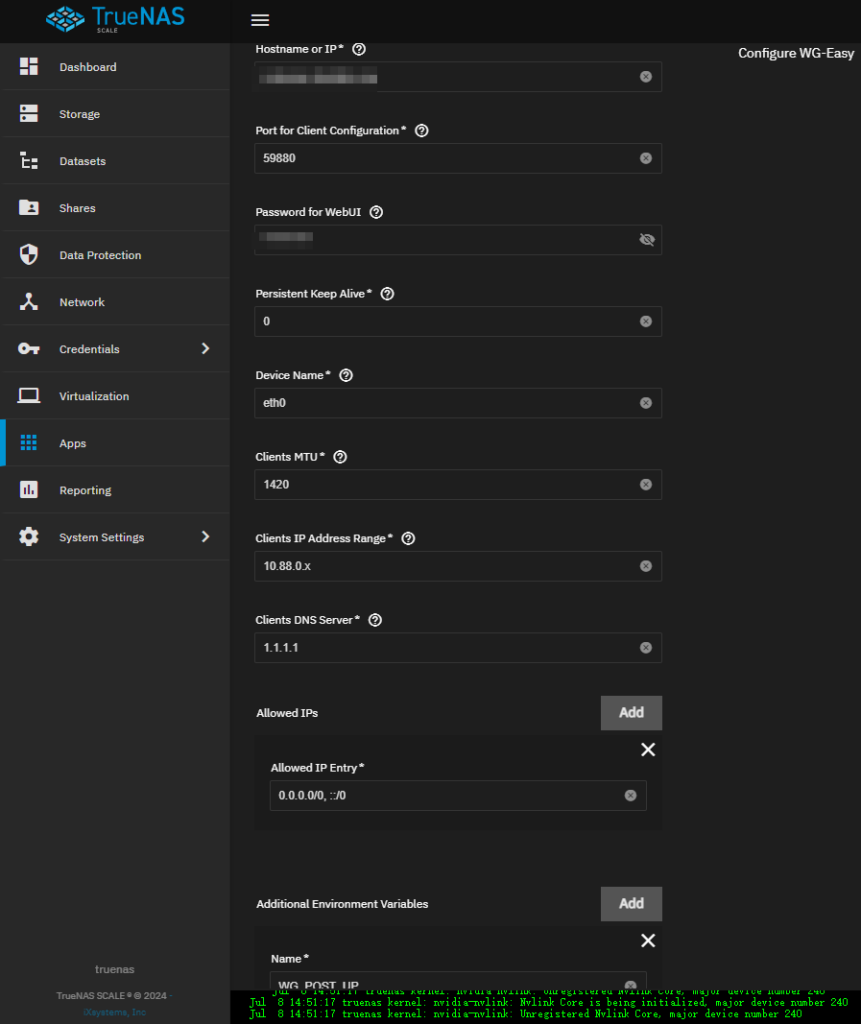
As shown in the screenshot below, make sure to check the Host Network box under Network Configuration. Once that’s done, you can leave most of the other settings at their default values. After confirming everything looks good, go ahead and create the application:

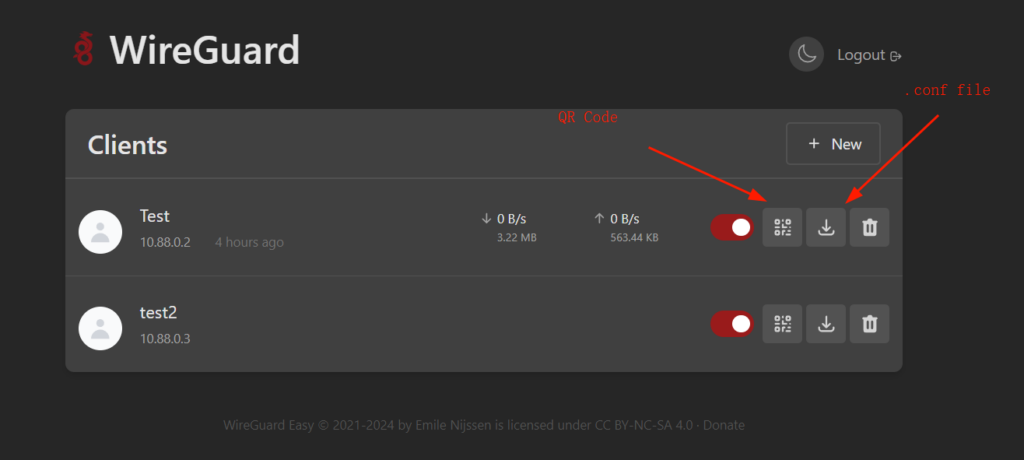
3. Adding the clients:
After configuring the WG-Easy variables, deploy the application and open the Web UI. From there, you’ll be able to start adding your clients easily:
4. Enable TrueNAS Scale IP Forwarding:
Click on TrueNAS System Settings > Advanced > Sysctl box add these two items and save:
| net.ipv4.ip_forward | 1 |
| net.ipv4.conf.all.src_valid_mark | 1 |
Conclusion
That’s it! Once you’ve installed a client and added it using either a QR code or a .conf file, you should be able to establish a connection right away. Of course, there are several ways to set up WireGuard, but the general concept remains consistent. The principles and steps we covered here can easily be adapted for other installation types as well.
Reference
TrueNAS Scale: Community Apps Documentation Hub
Official Project Page: GitHub
Also See my previous article on how to set up WireGuard on a Linux machine:
Self-Host a WireGuard VPN Server in a Few Easy Steps
Comments 3 comments
I am unable to add the env variables because they already exist in the config.js. How do I edit the config.js?
@Dizzle Hi Dizzle,
@Dizzle In your case, you may have already started the application after editing the Environment Variables? You can simply delete app and start over, or by logging in the correct shell and do further editing.
This is obsolete now for version ElectricEel-24.10.2.1 and forward.
Do not follow this guide, but instead, change the ethernet device using wireguard configuration> admin panel> interface> Device > change the value of the device to The truenas interface. You can find this by navigating to Network > Interfaces in the TrueNAS web interface.
No additional variables are needed neither on neither on truenas nor in docker container.