



Introduction
The Dell C2665dnf MFP is a multifunction printer with several functions, including the ability to scan and email documents. However, enabling scan to email settings on this printer might be difficult, particularly when using a Gmail account. In this blog article, we'll show you how to configure your Dell printer to scan and send emails using your Gmail account.
Note: A similar idea also applies to many other email account providers, not just Gmail; yes, even the self-hosted email option such as Mailcow.
Step 1: Google Account Preparation
Before we get started with the printer settings, you need to prepare your Google account to allow the Dell printer access. Google has security measures in place, so you'll need to enable the 2-Step Verification feature and generate an "App Password."
- Log in to your Google Gmail account.
- Activate 2-Step Verification by going to your Google Account settings.
- After enabling 2-Step Verification, go to the bottom of the 2-Step Verification page, then you will see "App Passwords." (if you do not see it, please search "APP Password" on the top of the search bar)
- Set up a password for all applications you plan to use, such as your printer. This generated password is crucial, so be sure to copy it (copy and edit it without the space). You'll need it to configure the printer.
Step 2: Printer Configuration
Now that your Google account is prepared, let's move on to configuring the Dell C2665dnf MFP.
- Log in to your printer via a web browser. You can usually do this by entering the printer's IP address in your web browser.
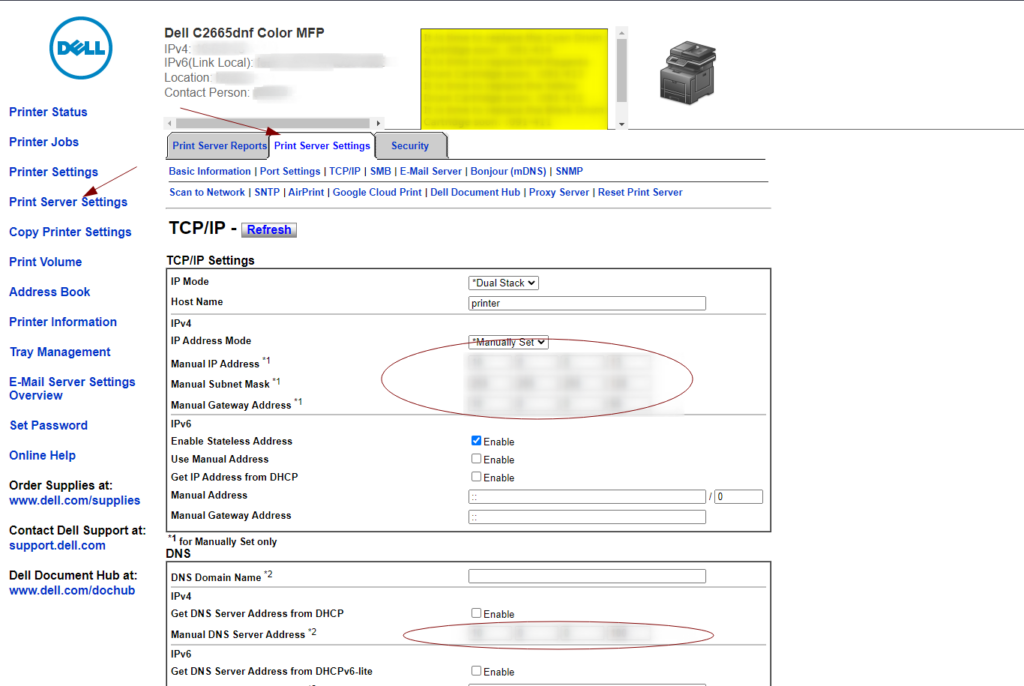
- Go to "Print Server Settings" on the left, and then click "Print Server Settings" again, and click on the "TCP/IP" tab. While we're here, make sure your IP settings are correct.
- In the "TCP/IP" settings, find the "DNS" IPv4 section. Uncheck the "Get DNS Server Address from DHCP" box and enter the "Manual DNS Server Address", your own DNS server, or a public DNS server such as 1.1.1.1 or 9.9.9.9.
- Apply the new settings at the bottom of the page by clicking on "Apply New Settings". Always remember to apply the settings before leaving the page to ensure they are saved.
Step 3: Email Server Settings
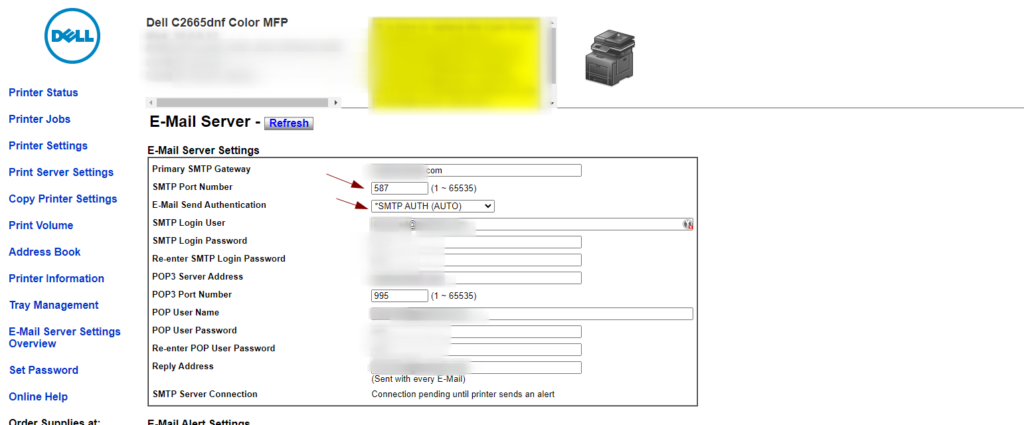
- Now, on the same page from the Print Server Setting, navigate to the "E-Mail Server" tab in the printer's web interface.
- Configure the following settings:
- Primary SMTP Gateway: smtp.gmail.com
- SMTP Port Number: 587(STARTTLS) or 465(SSL/TLS)
- E-Mail Send Authentication: SMTP AUTH (AUTO)
- SMTP Login User: Your Gmail login email
- SMTP Login Password: Paste the generated Gmail password you copied earlier
- Re-enter SMTP Login Password: Repeat the password
- Ignore POP and POP3 settings
- Reply Address: Your Gmail email address
- Apply the new settings at the bottom of the page, as always, to save the configuration.
Step 4: Security Settings
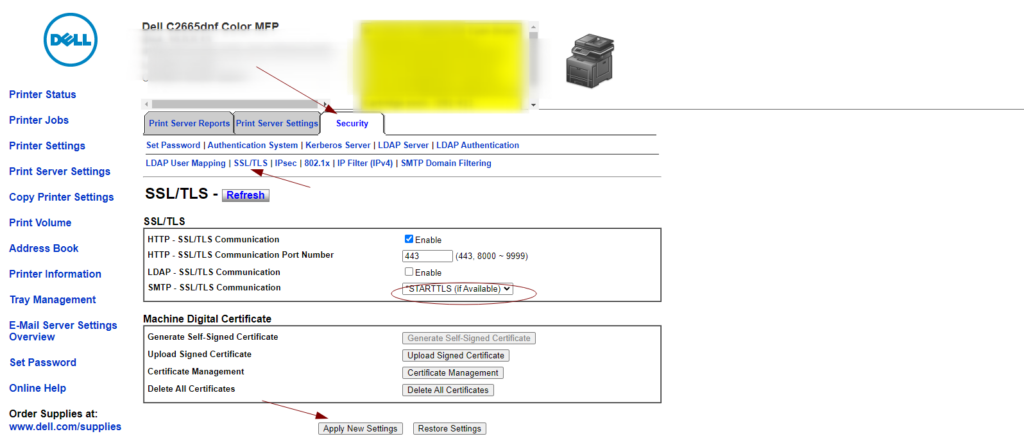
- Click the "Security" tab in the printer's web interface.
- And then click the "SSL/TLS" tab, under "SMTP - SSL/TLS Communication," select *STARTTLS (if Available) for port 587, or SSL/TLS for port 465.
- Apply the new settings at the bottom of the page to save the configuration.
After the configuration, you should be able to do a successful scan, and the Dell C2665dnf scanner will not save a copy of the scan in your email account sent folder.
Conclusion
You may use these instructions to configure your Dell C2665dnf MFP to scan and send emails using your Gmail account. Keep the created Gmail APP password ready since it is required for the setup procedure. After you've done these procedures, your printer should be ready to scan and email documents. Take use of this feature at your home or workplace!
Comments NOTHING