



1. Introduction
This FTP (File Transfer Protocol) software is named Very Secure FTP Server. Vsftpd is an FTP server software running on a Linux-like operating system. It is characterized by being small and light, safe and easy to use. FTPD suites commonly used in open-source operating systems mainly include ProFTPD, PureFTPd, and WU-FTPD.
Vsftp provides three login methods: 1. Anonymous login 2. Local user login 3. Virtual user login
Features of vsftpd:
- 1. Higher security requirements
- 2. Bandwidth limitation
- 3. Create and support virtual users
- 4. Support IPV6
- 5. Medium-to-high performance
- 6. Virtual IP can be assigned
- 7. High speed
- 8. Encryption support through SSL integration
- 9. It can be set to start from inetd, or an independent FTP server
- 10. The root directory of anonymous FTP does not require any special directory structure, system programs, or other system files
Three authentication modes of vsftpd:
- Anonymous mode: It is the most insecure authentication mode. Anyone can log in directly without password verification. When logging in to FTP, use the default user name, usually ftp or anonymous.
- Local user mode: It is a mode for authentication through the local account password information of the Linux system. Compared with the anonymous open mode in /etc/passwd, it is more secure and easy to configure. (In this article, we choose this mode to start)
- Virtual user mode: It is the most secure authentication mode among these three modes. It needs to establish a separate user database file for the FTP service, virtualize account information for password verification, and this account information is stored in the server system. actually does not exist, and is only used for authentication by the FTP service program. Using a virtual user account can provide a centrally managed FTP root directory, which facilitates the management of the administrator. At the same time, the user name and password used for FTP login are distinguished from the system user account, which further enhances the security of the FTP server. In a sense, anonymous users are also system users, just a mapping of system users. The public FTP will not use the system user as the FTP account, but more virtual users are used, which can ensure the security of the system.
Project link:
Project website: https://security.appspot.com/vsftpd.html
Vsftpd Github page: https://github.com/InfrastructureServices/vsftpd
Working principle:
Two channels are used in the FTP session:
Control channel: The channel for communicating with the Ftp server, linking to FTP, and sending FTP commands are all done through the control channel.
Data channel: data channel and FTP server for file transfer or list channel
FTP is a TCP-only-based service and does not support UDP. The difference is that FTP uses 2 ports, a data port and a Command port (also called a control port). Usually, these two ports are 21 (command port) and 20 (data port). But the way FTP works is different, the data port is not always 20. This is the biggest difference between active and passive FTP. FTP protocol has two working modes: PORT mode and PASV mode.
PORT mode (active mode)
The FTP client first establishes a connection with the TCP 21 port of the FTP server, and sends commands through this channel. When the client wants to receive data, it sends a Port command on this channel. The Port command includes what port the client uses (a port greater than 1024 ) to accept data, and when transmitting data, the server sends data through its own TCP port 20. At this time, the data connection is established by the server to the client.
Port interaction process:
Client-side: The client connects to port 21 of the server, and sends the user name password and a random port on 1024 and the port command to the server, indicating that the active mode is adopted, and the random port is opened.
Server-side: After receiving the Port active mode command and port from the client, the server will connect to the random port of the client through its own port 20, and then perform data transmission.
[Client] --(command port: 1024-65535)--> [Server: command port: 21]
[Server] --(data port: specified by client: 1024-65535)--> [Client: data port eg:20]
PASV mode (passive mode)
Establishing a control channel is similar to the Port mode. When the client sends a Pasv command through this channel, the Ftp server opens a random port between 1024 and 5000 and notifies the client to transmit data requests on this port, and then the Ftp server Data transfer will be done through this port. At this time, the data connection is established by the client to the server.
Pasv interaction process:
Client-side: The client connects to port 21 of the server, and sends the user name, password, and pasv command to the server, indicating that the passive mode is adopted.
Server-side: After receiving the pasv passive mode command from the client, the server tells the client the port that is randomly opened on 1024, and the client uses its own port 20 to connect to the random port of the server for data transmission.
Note: From the perspective of the Client/Server model, PORT is OUTBOUND for the server, and PASV mode is INBOUND for the server. Please pay special attention to this, especially in enterprises using firewalls. This is very critical. If the setting is wrong then the client will not be able to connect.
[Client] --(command port: 1024-65535)--> [Server: command port: 21]
[Client] <--(data port: specified by server: 1024-65535)--> [Server: data port, eg:20]
Requirement
- Debian 11 Linux distribution with root or sudo privileges to install software
- Allowed required ports through the firewall: 20,21,990/tcp, 40000:50000/tcp
- A client FTP software to test with, such as FileZilla for Windows or CLI tool for Linux
2. Installing vsftpd
Updating your package list and installing the vsftpd daemon:
sudo apt update -y && sudo apt install vsftpdCheck the status of the service:
sudo systemctl status vsftpd
3. Configure vsftpd
Now, let's proceed with the configuration. We'll make a backup of the original configuration file before making any changes.
sudo cp /etc/vsftpd.conf /etc/vsftpd.conf.bakNow you can edit the configuration file with your preferred text editor. In this tutorial, we will use nano text editor:
sudo nano /etc/vsftpd.confThe configuration file contains many options and comments that explain what they do. You can modify them according to your needs, but for this tutorial, we will focus on the following settings:
anonymous_enable: This option controls whether anonymous FTP is allowed or not. By default, it is set to 'YES', which means anyone can log in without providing a username or password. This is not secure or recommended, so you should change it to 'NO'.local_enable: This option controls whether local users can log in or not. By default, it is commented out with a pound sign (#), which means it is disabled. You should uncomment it by removing the pound sign (#) and setting it to 'YES' so that users with a local shell account can use FTP.write_enable: This option controls whether users can perform write operations such as creating, deleting, or modifying files and directories on the server. By default, it is commented out with a pound sign (#), which means it is disabled. You should uncomment it by removing the pound sign (#) and setting it to 'YES' so that users can upload files to their home directory.chroot_local_user: This option controls whether users are restricted to their home directory or not. By default, it is commented out with a pound sign (#), which means it is disabled. You should uncomment it by removing the pound sign (#) and setting it to 'YES' so that users cannot access any files or commands outside their home directory. This is also known as chroot jail.
Other settings that you can include that are not specified in this tutorial:
local_umask=022: The umask value when a local user adds a new file. The default value is 077.file_open_mode=0755: The file permission after the local user uploads the file is the same as the value used by chmod. The default value is 0666.dirmessage_enable=YES: Create a ".message" file in the directory that needs to be accessed, and write a welcome message, so that it will be displayed when switching to the directory.
To make these changes in the configuration file, look for these lines and make the change as show:
# Allow anonymous FTP? (Disabled by default).
anonymous_enable=NO
#
# Uncomment this to allow local users to log in.
local_enable=YES
#
# Uncomment this to enable any form of FTP write command.
write_enable=YES
#
# You may specify an explicit list of local users to chroot() to their home
# directory. If chroot_local_user is YES, then this list becomes a list of
# users to NOT chroot().
# (Warning! chroot'ing can be very dangerous. If using chroot, make sure that
# the user does not have write access to the top level directory within the
# chroot)
chroot_local_user=YES
To ensure proper data transfer, enable the passive mode and specify a port range. Add the following lines to the configuration file:
##Enable Passive Mode (Optional)
#If you plan to use passive mode for FTP connections, uncomment and add the following lines:
#pasv_enable=YES
#Set the minimum value of the port range that can be used to establish data transmission in passive mode
pasv_min_port=40000
#Set the maximum value of the port range that can be used to establish data transmission in passive mode
pasv_max_port=50000
Next, add a user_sub_token and local_root directive, when this option makes sure that when this user and future users log in, they will be sent to the proper user's home directory. vsftpd will dynamically substitute the $USER environment variable with the actual username of the user logging in. The user_sub_token directive ensures that users are routed to their respective home directories, and the local_root directive sets the FTP root directory to the user's home directory, allowing for appropriate access and restrictions. Insert the following settings anywhere in the file:
user_sub_token=$USER
local_root=/home/$USER/ftp
Set the configuration so that users allow FTP access only when they are directly added to a list, rather than by default, also can insert anywhere in the file:
userlist_enable=YES
userlist_file=/etc/vsftpd.userlist
userlist_deny=NO
When you're done editing, save the file and quit the editor. If you edited the file using nano, you do it by hitting CTRL + X, Y, then ENTER.
4. Users Configuration
You will establish a special FTP user in this step. However, you could already have a user who requires FTP access. Even though this tutorial can be used by current users for FTP access, we recommend that you start with a new dedicated FTP user until you've created and verified your system before altering any current users.
Do it by the script:
For creating a user, I am creating a bash script that you can add automatically and configure permission:
To get started, you can create a file named 'add_ftp_user.sh' in the home folder using the 'nano' text editor. This script aims to create a user if they don't already exist, add the user to the allowed FTP user list, and set up the appropriate permissions for both the FTP home directory and a writable files directory called 'files' designated to hold the actual files.
#!/bin/bash

# Check if the script is run as root
if [[ $EUID -ne 0 ]]; then
   echo "This script must be run as root."
   exit 1
fi

# Function to add user to vsftpd.userlist
function add_user_to_vsftpd_userlist() {
    local username=$1
    if grep -Fxq "$username" /etc/vsftpd.userlist; then
        echo "User $username is already in the vsftpd.userlist file."
    else
        echo "$username" >> /etc/vsftpd.userlist
        echo "User $username added to vsftpd.userlist successfully."
        systemctl restart vsftpd
    fi
}

# Function to add user to the system
function add_user_to_system() {
    local username=$1
    if id "$username" &>/dev/null; then
        echo "User $username already exists on the system."
    else
        read -s -p "Enter the password for $username: " password
        echo
        adduser --disabled-login --gecos "" "$username"
        echo "$username:$password" | chpasswd
        echo "User $username added to the system successfully."
    fi
}

# Function to set up the FTP directories and permissions
function setup_ftp_directories() {
    local username=$1
    sudo mkdir "/home/$username/ftp"
    sudo chown nobody:nogroup "/home/$username/ftp"
    sudo chmod a-w "/home/$username/ftp"
    sudo mkdir "/home/$username/ftp/files"
    sudo chown "$username:$username" "/home/$username/ftp/files"
    echo "FTP directories and permissions set up for user $username."
}

# Prompt for the username
read -p "Enter the username you want to add: " username

# Confirm the user addition to the system level
read -p "Do you want to add $username to the Linux system level? (y/n): " confirm_system

if [[ $confirm_system =~ ^[Yy]$ ]]; then
    add_user_to_system "$username"
fi

# Confirm the user addition to the vsftpd userlist
read -p "Do you want to add $username to the vsftpd userlist? (y/n): " confirm_vsftpd

if [[ $confirm_vsftpd =~ ^[Yy]$ ]]; then
    add_user_to_vsftpd_userlist "$username"
fi

# Set up the FTP directories and permissions
setup_ftp_directories "$username"
Save the script and make it executable:
chmod +x add_ftp_user.sh
Then we need to run as sudo administrator privilege, if your user has not been created, be sure to say 'y', and assign a password for the new user when prompted:
sudo ./add_ftp_user.shDo it manually:
If you don't want to use the script, you can also do it manually, such as adding a user John (the command addusers will ask for you to enter a password for that account):
sudo adduser johnCreate the FTP folder for that user:
sudo mkdir /home/john/ftpSet its ownership to nobody user and nogroup group:
sudo chown nobody:nogroup /home/john/ftpRemove write permissions for that ftp directory:
sudo chmod a-w /home/john/ftpAfter changing the permissions, you can verify the permission, it looks something like this:
sudo ls -la /home/john/ftpIt looks something like this
Output

total 8
dr-xr-xr-x 2 nobody nogroup 4096 .
drwxr-xr-x 3 john john 4096 ..
Next, make a directory for file uploads and give that user ownership:
sudo mkdir /home/john/ftp/files && sudo chown john:john /home/john/ftp/filesVerify the permission once again with sudo ls -la /home/john/ftp command and should show the following:
Output
total 12
dr-xr-xr-x 3 nobody nogroup 4096 .
drwxr-xr-x 3 john john 4096  ..
drwxr-xr-x 2 john john 4096 files
If you want you can create a test file and then check it later:
echo "A vsftpd testing file only" | sudo tee /home/john/ftp/files/test.txt
Output
A vsftpd testing file only
Finally, put your user in the /etc/vsftpd.userlist file to allow that user. To append to the file, use the -a flag:
echo "john" | sudo tee -a /etc/vsftpd.userlistRestart vsftpd service to apply the changes and check service status:
sudo systemctl restart vsftpd && sudo systemctl status vsftpdWe now create the user and the correct permissions, if you want to disable the account sign in to SSH, so it limits only to FTP users only, we can disable Shell Access for the account. Also, this does not apply to the user or system-wide who have a public key authentication only. (This step is completely optional)
Now, create a file called ftponly in the bin directory:
sudo nano /bin/ftponlyAdd a message warning the user of the reason they are unable to log in:
#!/bin/sh
echo "This account is only used for the FTP files only."
Then, modify the file's permissions to make it executable:
sudo chmod a+x /bin/ftponlyOpen the list of valid shells:
sudo nano /etc/shellsand the following line to the bottom of the file
. . .
. . .
. . .
/bin/ftponly
Now, if you created the user before, we need to update the user to the shell we just created:
sudo usermod john -s /bin/ftponlyIf we try to log into that user on your FTP server, you will receive the warning message that you created earlier. This validates that the user no longer has ssh access to the server and is only allowed FTP access. That is also much better for server security, so we only get the necessary permission for the user who to access the file but not the Linux itself.
Now that the configuration is complete, you may test FTP access.
5. Test Your FTP Access
We've set up the server such that only the user john may log in through FTP (or any other users you may also set up). Now we'll make sure everything functions as it should. You can try to connect anonymously now that you've stopped anonymous access. Anonymous users should be prevented access if the setting is correct. Run the following command in a new terminal window. Ensure to change 999.999.999.999 with the public IP address or domain name of your server, the following scenario can be tested from Windows or Linux CLI:
ftp 999.999.999.999if you cannot open it, try ftp -p 999.999.999.999 or just type ftp into your terminal (you will see ftp> ), and then type open, then follow the on-screen institution. Try signing in as a nonexistent user, such as anonymous, when requested for a username, and you will get the following output:
Output
Connected to xxx.xxx.xxx.xxx.
220 (vsFTPd 3.0.3)
Name (xxx.xxx.xxxx.xxx:default): anonymous
530 Permission denied.
ftp: Login failed.
ftp>
We're going to close this connection and then try to connect as the user that is already in the allow list:
ftp> byeAnd then try user john, it should be able to connect to the FTP server with read, and write files. Additionally, ensure that additional specified FTP users can connect successfully:
$ ftp xxx.xxx.xxx.xxx
Output

Connected to xxx.xxx.xxx.xxx.
220 (vsFTPd 3.0.3)
200 Always in UTF8 mode.User (xxx.xxx.xxx.xxx:(none)):john
331 Please specify the password.
Password: YOUR PASSWORD
230 Login successful.
Remote system type is UNIX.
Using binary mode to transfer files.
ftp>
Now we are able to navigate the directory:
ftp> cd filesOutput
250 Directory successfully changed.Read permissions: We can also use the get command to download the file that we are earlier created in your files:
ftp> get test.txtWrite permissions: If we want to upload any file, we can do that by using the put command to upload any file from the local machine to the FTP server:
ftp> put myuploadtest.txt upload-from-the-local-machine.txtThe above operation should be successful, if you finish the connection, you can close The connection by doing the bye command again.
After you've tested your settings, you'll proceed to protect your file transfer better.
6. Enable TLS on the FTP server
Because FTP does not encrypt any data in transit, including user credentials, you should activate TLS/SSL to do so. The first step is to generate a self-signed SSL certificate that will be used with vsftpd:
sudo openssl req -x509 -nodes -days 2920 -newkey rsa:2048 -keyout /etc/ssl/private/vsftpd.pem -out /etc/ssl/private/vsftpd.pemYou’ll be prompted to provide address information for your certificate.
After you've generated the certificates, return to the vsftpd configuration file:
sudo nano /etc/vsftpd.confmake sure to comment out the old line: rsa_cert_file=/etc/ssl/certs/ssl-cert-snakeoil.pem and rsa_private_key_file=/etc/ssl/private/ssl-cert-snakeoil.key and then add the following lines at the bottom of the file, pointing to the certificate and private key you generated:
....
.....
rsa_cert_file=/etc/ssl/private/vsftpd.pem                                                                                                                                                                                                                                   rsa_private_key_file=/etc/ssl/private/vsftpd.pem
You will now force the usage of SSL. This is required to guarantee that all traffic is encrypted; this means that the period step concerning the FTP command is no longer applicable in this circumstance; it may also compel your FTP user to change clients. Change or modify the line to the following:
. . .
ssl_enable=YES
. . .
Following that, add the following lines to explicitly reject anonymous SSL connections and need SSL for both data transmission and logins:
. . .
allow_anon_ssl=NO
force_local_data_ssl=YES
force_local_logins_ssl=YES
. . .
Then, add the following lines to configure the server to utilize TLS, the recommended successor to SSL:
. . .
ssl_tlsv1=YES
ssl_sslv2=YES
ssl_sslv3=YES
. . .
Finally, include two more options. The first will not require SSL reuse because it will cause many FTP clients to fail. The second will necessitate "high" encryption cipher suites, which currently imply key lengths of 128 bits or greater:
. . .
require_ssl_reuse=NO
ssl_ciphers=HIGH
. . .
The following are all the options we added in this step (If you do not make any changes different than this, you can copy and paste the following into the end of the file):
rsa_cert_file=/etc/ssl/private/vsftpd.pem
rsa_private_key_file=/etc/ssl/private/vsftpd.pem
ssl_enable=YES
allow_anon_ssl=NO
force_local_data_ssl=YES
force_local_logins_ssl=YES
ssl_tlsv1=YES
ssl_sslv2=YES
ssl_sslv3=YES
require_ssl_reuse=NO
ssl_ciphers=HIGH
If you're done with all the configuration changes, make sure to save and close the file and restart the services for the change to take effect:
sudo systemctl restart vsftpdAt this point, if we try to use the step 5 method to connect to the FTP server, it will deny by the server:
ftp xxx.xxx.xxx.xxxConnected to xxx.xxx.xxx.xxx.
220 (vsFTPd 3.0.3)
200 Always in UTF8 mode.
User (xxx.xxx.xxx.xxx:(none)): USERNAME
530 Non-anonymous sessions must use encryption.
Connection closed by remote host.Next, ensure that you can connect using a TLS-capable client, such as FileZilla.
7. Using FileZilla to test FTP with TLS Connection
Modern FTP clients including FileZilla and WinSCP, can handle the TLS encryption protocol. But in this tutorial will focus on FileZilla. If you don't already have FileZilla, you can download it from the official website: https://filezilla-project.org/ and then install it on your computer.
After the installation is complete, open FileZilla from your applications or programs list. In FileZilla, go to the "File" menu at the top-left corner and select "Site Manager" from the dropdown list.
In the Site Manager, click on the "New Site" button and give your site a descriptive name (e.g., "FTP with TLS").
In the "General" tab of the Site Manager, enter the following details:
- Host: The hostname or IP address of the FTP server.
- Port: The FTP port number (usually 21 for non-TLS FTP and 990 for FTP with TLS, or you can just leave a blank at this time).
- Protocol: Choose "FTP - File Transfer Protocol."
- Encryption: Select "Require explicit FTP over TLS."
- Logon Type: Choose "Ask for Password."
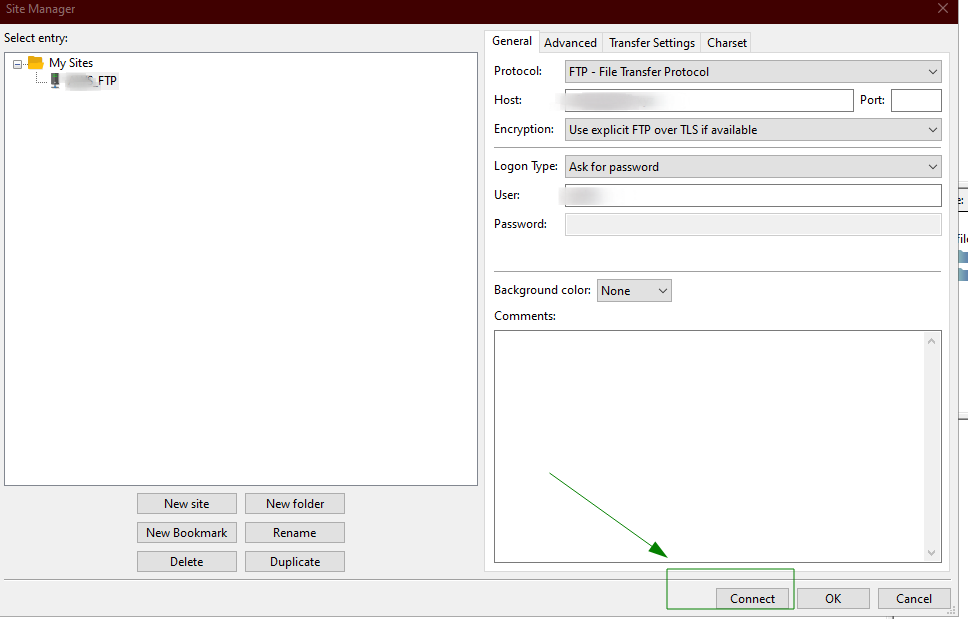
At the bottom of the interface, click the Connect button. You will be prompted to enter the user's password:
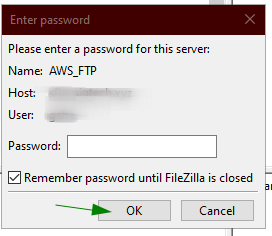
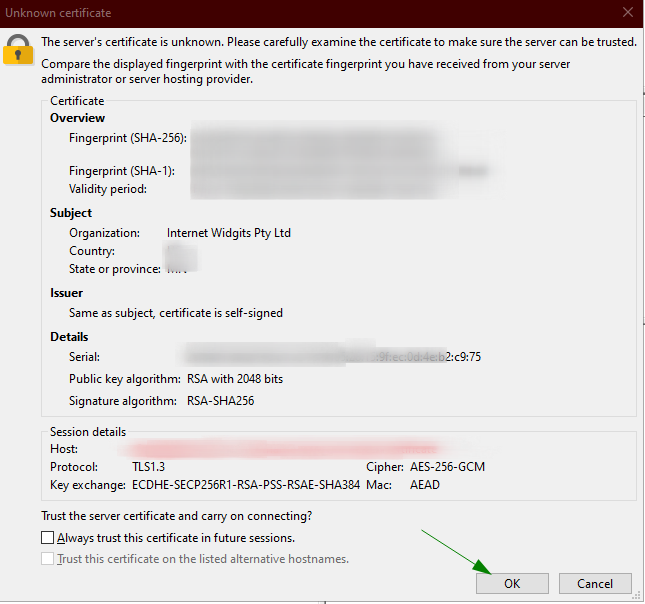
To connect, enter your password and click OK. You should now be using TLS/SSL encryption to connect to your server. Following that, you will be shown a server certificate similar to the one seen below, click 'OK' to establish the FTP connection with TLS:
You can now navigate through your local files on the left pane and remote files on the right pane. To upload or download files, simply drag and drop them between the two panes.
8. Troubleshooting
If the vsftp connection is very slow, it is because reverse_lookup (reverse analysis) is enabled by default, try adding the following line in vsftpd.conf file
...
...
reverse_lookup_enable=NO
Then
sudo systemctl restart vsftpd9. Conclusion
Congratulations! 🎉 You have successfully configured vsftpd on your Debian 11 system. The FTP server is now set up to securely transfer files between users and the server. Please note, this is not the only way to configure your vsftpd server because this is based on Linux and user authentication you have many other options to do so. If you need to use an external authentication source, you should look at vsftpd's virtual user support. This provides a rich range of settings via PAM, or Pluggable Authentication Modules, and is a suitable alternative if you handle users in another system, such as LDAP or Kerberos. Otherwise, I hope hopefully you find this tutorial helpful if you have any problems or concerns you can leave a comment in the comment section.
Comments NOTHING