



Proxmox VE 9 is officially out, bringing a new Debian base and a wave of improvements to the platform. In this post, I’ll walk through a quick, practical in-place upgrade from Proxmox VE 8 to 9, focused purely on getting an existing system upgraded with minimal effort. This is not a replacement for the official documentation, and you should absolutely read the Proxmox upgrade guide first.
⚠️ 🚨Important: Always consult and follow the official Proxmox VE 8→9 upgrade guide first:
🔗 https://pve.proxmox.com/wiki/Upgrade_from_8_to_9
Step 1 — Prepare the Node(s)
⚠️ Verify Backup and Free Space
Confirm you have tested backups of:
- Virtual Machines and Containers
/etc/pve/etc/network/interfaces- PBS backups (if used)
Ensure the root partition has at least ~5 GB free (10 GB or more recommended).
Check Current Proxmox Version
#!/bin/bash
pveversion
You need Proxmox VE 8.4.1 or newer before attempting the upgrade.
Step 2 — Update Proxmox VE 8 to Latest Patch
Update and install all current fixes:
#!/bin/bash
apt update
apt dist-upgrade
Reboot once done:
#!/bin/bash
reboot
Verify version again after reboot:
#!/bin/bash
pveversion
Step 3 — Merge Maintenance and Ceph Considerations
If you are in a cluster environment, migrate all tasks off the node you are about to update and enable maintenance mode to stop HA services:
#!/bin/bash
ha-manager crm-command node-maintenance enable <node-name>
If using Ceph:
#!/bin/bash
ceph osd set noout
This prevents data rebalancing while the node is offline for upgrade.
Also run the official Proxmox upgrade checker:
#!/bin/bash
pve8to9 --full
Resolve any issues reported before proceeding, if need to remove packages, perform the operation carefully.
One of the common error you may ran into it will be the systemd-boot package:

See the links for details: https://pve.proxmox.com/wiki/Upgrade_from_8_to_9#sd-boot-warning, otherwise, remove it using the following command:
#!/bin/bash
apt remove systemd-boot
Please run the pve8to9 --full command again to ensure no additional issues are present.
Step 4 — 📦Update APT Repositories for Debian & Proxmox VE 9
Proxmox VE 9 is based on Debian 13 “Trixie”, the source repository in the new deb822 style, so update the underlying Debian and Proxmox repositories:
/etc/apt/sources.list.d/debian.sources
#!/bin/bash
cat > /etc/apt/sources.list.d/debian.sources << EOF
Types: deb deb-src
URIs: http://deb.debian.org/debian/
Suites: trixie trixie-updates
Components: main non-free-firmware
Signed-By: /usr/share/keyrings/debian-archive-keyring.gpg

EOF
Add Debian security:
#!/bin/bash
cat >> /etc/apt/sources.list.d/debian.sources << EOF
Types: deb deb-src
URIs: http://security.debian.org/debian-security/
Suites: trixie-security
Components: main non-free-firmware
Signed-By: /usr/share/keyrings/debian-archive-keyring.gpg
EOF
Verify the the file, use command:
#!/bin/bash
ls /etc/apt/sources.list.d/
Add Proxmox VE 9 Repositories
Enterprise repository
#!/bin/bash
cat > /etc/apt/sources.list.d/pve-enterprise.sources << EOF
Types: deb
URIs: https://enterprise.proxmox.com/debian/pve
Suites: trixie
Components: pve-enterprise
Signed-By: /usr/share/keyrings/proxmox-archive-keyring.gpg
EOF
No-Subscription repository
#!/bin/bash
cat > /etc/apt/sources.list.d/proxmox.sources << EOF
Types: deb
URIs: http://download.proxmox.com/debian/pve
Suites: trixie
Components: pve-no-subscription
Signed-By: /usr/share/keyrings/proxmox-archive-keyring.gpg
EOF
Verify the the file, use command:
#!/bin/bash
ls /etc/apt/sources.list.d/
Step 5 — 📦Update Ceph Repositories (Optional)
If using Ceph and already running Ceph 19.2 Squid, update its repository entries:
Enterprise Ceph
#!/bin/bash
cat > /etc/apt/sources.list.d/ceph.sources << EOF
Types: deb
URIs: https://enterprise.proxmox.com/debian/ceph-squid
Suites: trixie
Components: enterprise
Signed-By: /usr/share/keyrings/proxmox-archive-keyring.gpg
EOF
No-Subscription Ceph
#!/bin/bash
cat > /etc/apt/sources.list.d/ceph.sources << EOF
Types: deb
URIs: http://download.proxmox.com/debian/ceph-squid
Suites: trixie
Components: no-subscription
Signed-By: /usr/share/keyrings/proxmox-archive-keyring.gpg
EOF
Verify the the file, use command:
#!/bin/bash
ls /etc/apt/sources.list.d/
Step 6 — Remove Old .list Repository Files and Refresh Packages
After adding the new repositories for Debian Trixie, Proxmox 9, and (optionally) Ceph Squid, remove any remaining old Debian/Bookworm or Proxmox 8 .list files to prevent conflicts during the upgrade.
Before deleting anything, you may want to back up old repo files, in case you need to inspect them later:
#!/bin/bash
mkdir -p ~/apt-repo-backups
cp /etc/apt/sources.list ~/apt-repo-backups/
cp -a /etc/apt/sources.list.d ~/apt-repo-backups/
Run this command:
#!/bin/bash
# Review old .list in the /etc/apt/sources.list.d files first
find /etc/apt/sources.list.d -type f -name '*.list' -print

# Remove all old .list files
find /etc/apt/sources.list.d -type f -name '*.list' -exec rm -fv {} \;

# Show current sources.list
cat /etc/apt/sources.list

# remove the sources.list file
rm /etc/apt/sources.list
With all new repositories in place:
#!/bin/bash
apt update  #ensure it is from the Trixie sources are listed.
Step 7 — Upgrade to Proxmox VE 9
Now proceed with the upgrade:
#!/bin/bash
apt dist-upgrade
During the process you will be prompted about configuration file decisions:
Click Yes on the Configuring libc6:amd64 Prompt:

| File | Suggested Choice |
|---|---|
/etc/issue | N (Keep the current settings) |
/etc/lvm/lvm.conf | Y (use new maintainer version) |
/etc/ssh/sshd_config | N (Keep the current settings) |
/etc/default/grub | N (Keep the current settings, unless unchanged) |
/etc/chrony/chrony.conf | Y (Use maintain a version, if unchanged) |
Review prompts and respond based on your customizations.
⚠️Important, also in the official documentation, if you're using UEFI mode with LVM, GRUB Might Fail To Boot, using the following commands to check:
#!/bin/bash
[ -d /sys/firmware/efi ] && echo "UEFI boot" || echo "Legacy BIOS boot"   # To check if your system are using UEFI.


# Installing the following correct grub meta-package to boot
[ -d /sys/firmware/efi ] && apt install grub-efi-amd64

# Command to check grub menu if needed:
grep "^menuentry" /boot/grub/grub.cfg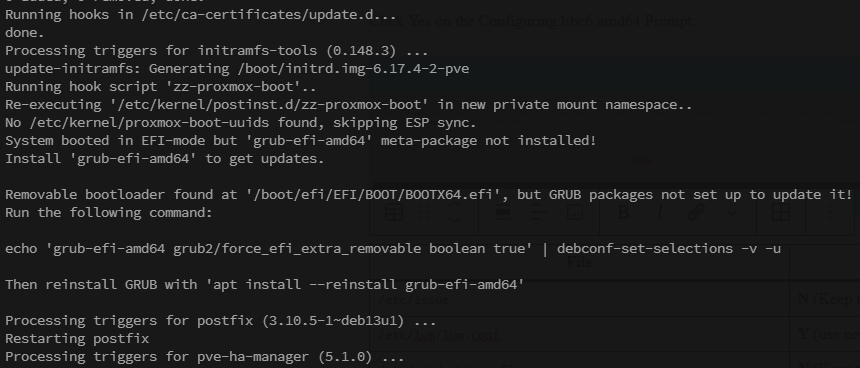
Step 8 — Reboot & Verify
After the upgrade completes:
#!/bin/bash
reboot
Verify you are now running Proxmox VE 9:
#!/bin/bash
pveversion
Step 9 — Restore Cluster Services
If in a cluster:
#!/bin/bash
ha-manager crm-command node-maintenance disable <node-name>
If using Ceph:
#!/bin/bash
ceph osd unset noout
Verify cluster status:
#!/bin/bash
pvecm status  $ Check the Proxmox cluster status
ceph -s  # verify the Ceph cluster is in a healthy state
Repeat for each node one at a time if needed.
Tips & Summary
- Perform the upgrade one node at a time in a cluster to maintain quorum and reduce risk.
- If using maintenance or HA, ensure all workloads have been migrated off the node before upgrading.
- Test upgrades in a staging environment if possible.
- Console access (iDRAC/iKVM) is recommended in case SSH drops.
Proxmox VE 9 introduces improvements in storage, networking, and overall system management. A careful, planed upgrade, updating repositories, and following the official checklist and repository changes — will help ensure a smooth transition from version 8 to version 9.
Comments NOTHING