



Introduction:
In the realm of printer installations, the choice between installing a printer driver via a TCP/IP port and utilizing a WSD port can significantly impact the efficiency and performance of your printing setup. While both options have their merits, this article delves into why opting for the TCP/IP port is often the preferred and crucial choice, emphasizing its importance in ensuring seamless printing operations.
Understanding Printer Driver Installation Options:
Before delving into the specifics, it's essential to grasp the differences between installing a printer driver through a TCP/IP port and using alternative options such as a WSD port. Web Services on Devices (WSD) can be an efficient method for deploying operating systems, but it may not be the optimal choice for printer driver installations.
So, you've got your printer, and you're thinking, "WSD port, the add a printer way, right?" Sure, it's WSD makes devices Plug and Play. But, hold up – even though WSD is all about ease, it might not be the MVP in every tech scenario. Technically speaking, the WSD is not a port, but a port monitor (AKA: 'WSDMon' more details please see this post by CraigMarcho), that advertises itself to the network, this means that other devices on the network should still be able to discover and communicate with the printer, even if its IP address has changed, due to the ID used by WSD is unique to the device and does not change even if its IP address changes. This allows other devices on the network to consistently identify and communicate with the printer regardless of its network configuration.
This is all well and good, but sometimes WSD can cause printing problems when communicating with the printer due to network issues or advertising issues, and not all the manufacturing printer functions will show up either. If you want a little bit more control or sometimes a little bit more features, we will show you using the TCP/IP method to communicate with the printer. The nicest feature is that, unlike the WSD protocol, TCP/IP is not confined to the same network you have to be on. This means that you can print from numerous VLAN/Networks to the printer network. Most of the drivers when you download and install them using the executable installation wizard, will be set up in this way, for some printer driver vendors you see the option to choose to use TCP/IP when using the insulation method wizard. If the setup wizard doesn't support it or doesn't have an EXE setup program, we have to do it manually.
Before we get in the setup there's something important we should do, if you do not plan to use WSD service at all we should completely disable the service on the printer. If your Windows 10/11 Network Discovery is on and the printer is on the same network as your PC, more likely your printer is already set up on your PC automatically, in old Windows 8 Windows will stop automatically adding when reaches 30 printers. That would not be ideal in an enterprise setting because there may be hundreds of printers near enough to fill your printer's folder. Here is how to disable this feature when Windows tries to "helpful" add drivers/print queues on our system:
In Windows Advanced Sharing Settings, either turn off Network Discovery or turn off automatic setup for network-connected devices:
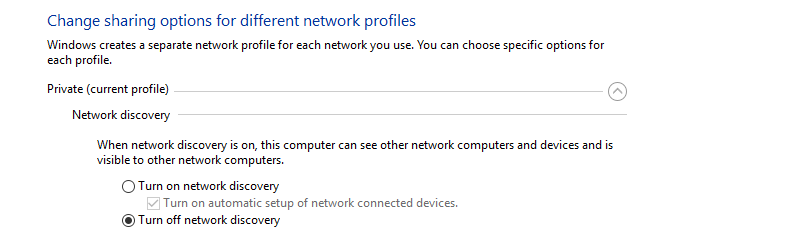
Or using Windows CMD or PowerShell:
netsh advfirewall firewall set rule group="Network Discovery" new enable=NoOr by Group Policy:
User Configuration > Administrative Templates > Control Panel > Printers (find: Turn off Windows default printer management and enable this)
Another method to make changes to the Windows registry in PowerShell command:
Set-ItemProperty -Path "HKLM:\SOFTWARE\Microsoft\Windows\CurrentVersion\Device Metadata" -Name “PreventDeviceMetadataFromNetwork” -Value 1 | Out-NullStep 1: Acquire the Driver from the Manufacturer's Website
Go to your printer's official website to download the driver, either PCL PS, PPD, XPS, or even Fax driver for your printer. Download x64 if you're running an x64 architecture system or if you are running a print server download the x64/x86/ARM/AArch64 driver or all of them, if you have a different PC requirement for your use case.
Step 2: Adding the Print Driver
If you are running a Windows server or professional version of Windows you can use print management (open printmanagement.msc as administrator to run it) will be much easier to manage and deploy the printer driver. If you are using the home version of Windows the following method will be used, adding printer and driver dialogue are the same on print management:
The first command (in Windows 10/11 can be abbreviated as printui /s /t2) at below can be used to delete or add a port or a driver:
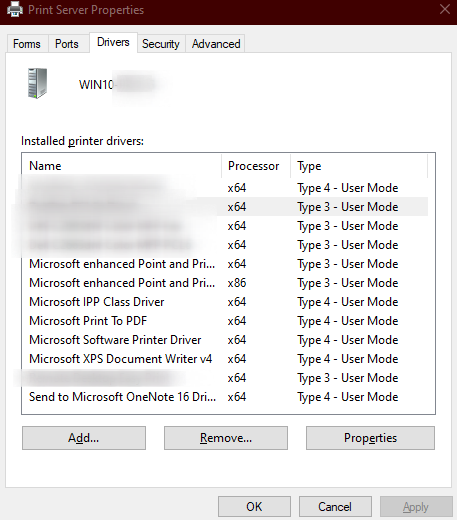
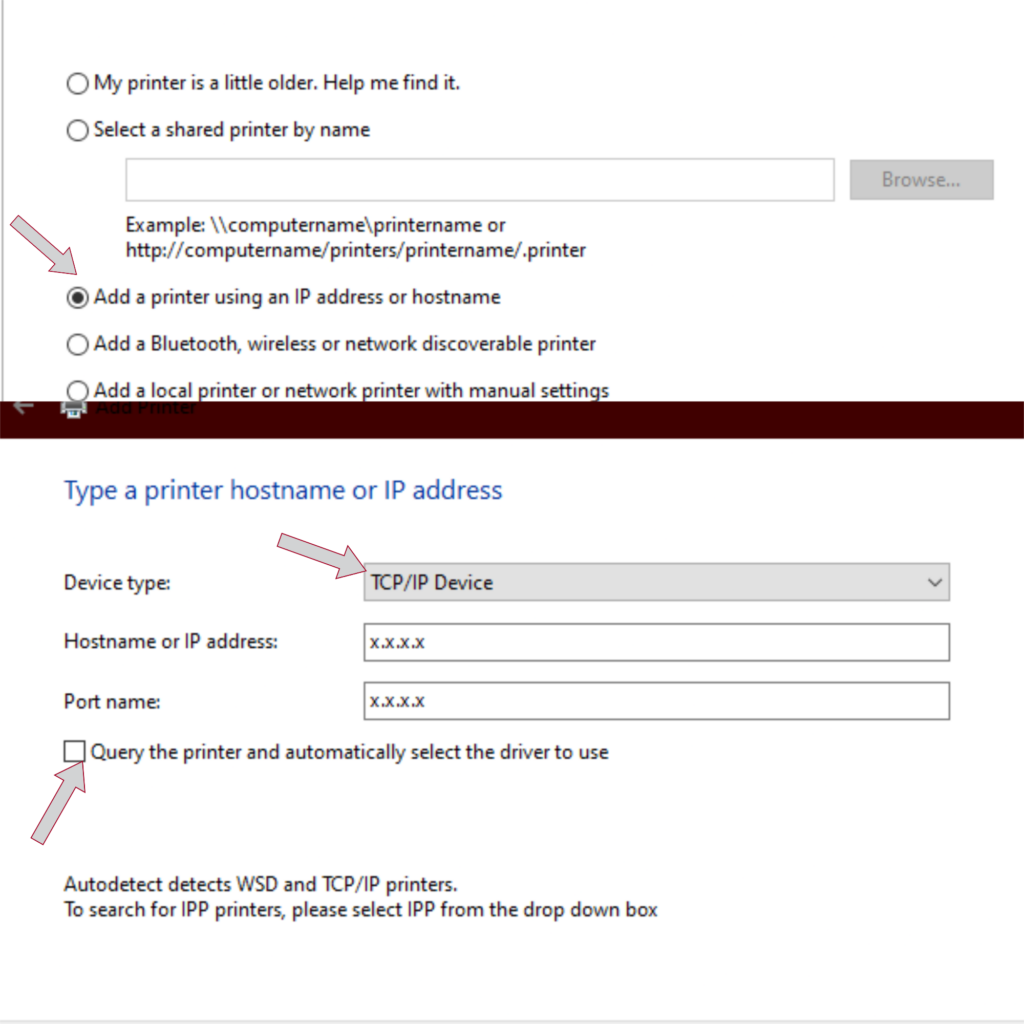
The second command( (in Windows 10/11 can be abbreviated as printui /im ) below can be used for adding a printer by IP address, be sure to uncheck 'query the printer and automatically select the driver to use' and allow us to select the driver manually, then follow the process to be completed:
The following are the commands for using CMD or PowerShell as administrator to open and change the corresponding action:
CMD:
"C:\WINDOWS\system32\rundll32.exe" printui.dll,PrintUIEntryDPIAware /s /t2"C:\WINDOWS\system32\rundll32.exe" printui.dll,PrintUIEntryDPIAware /imPowershell:
rundll32.exe printui.dll,PrintUIEntryDPIAware /s /t2rundll32.exe printui.dll,PrintUIEntryDPIAware /imReferences:
Microsoft Learn: https://learn.microsoft.com/en-us/windows-server/administration/windows-commands/rundll32-printui
Comments NOTHING