



Introduction
This guide shows how to run x11vnc so it shares the real X display (the physical screen), how to make it start before login (so the login screen is visible for as much as possible. ), how to make it resilient across logout/login, and how to lock it down to localhost only so you must SSH (or VPN) to reach it. Tested primarily on antiX Linux (sysVinit / slimski) and on Ubuntu / Linux Mint (systemd) — other Debian-based systems will likely behave the same. This setup is great for secure remote management, kiosks, remote support, or for video recording.
Key facts up front: x11vnc attaches to an existing X11 screen (it does not create a separate virtual desktop), so it’s ideal when you want to see/control what’s actually on the monitor.
Why Use x11VNC Instead of TightVNC?
x11vnc connects to the existing, real X11 display session.
That means:
- You see the actual physical screen
- You control the same session the user sees
- Perfect for remote assistance or kiosk monitoring
In contrast:
TightVNC (or TigerVNC server):
- Creates a new virtual desktop session
- Does not attach to the physical display
- More suitable for virtual desktop environments
For real screen control and kiosk usage, x11vnc is the better choice.
Tested Systems
This guide has been tested on:
- antiX Linux (Debian-based, non-systemd), I have sysVinit + slimski
- Debian-based with systemd
- Linux Mint
- Ubuntu 22.04+
Most other Debian-based systems will likely work fine. Feel free to test.
Overview of the setups
- The basic Debian package installation process.
- antiX Linux (sysVinit + slimski) — supervisor script + SysV init script (full example included).
- systemd systems + lightdm — systemd unit example.
- Test: SSH tunneling example.
- Known issues and common gotchas.
- Securities checklist and reminder.
- Other related programs
- Appendix: Window desktop environment component study.
1. The Basic Debian System Package Installation Process:
#!/bin/bash
# Are we on Xorg or Wayland?
echo $XDG_SESSION_TYPE
# or, if not in a GUI shell, try:
loginctl show-session $(loginctl | awk '/seat0/{print $1; exit}') -p Type

# Which display manager is installed/active? Useful for a specific display manager configuration:
cat /etc/X11/default-display-manager
ps -e | grep -E 'slim|slimski|lightdm|xdm|gdm|gdm3|sddm|lxdm|mdm|nodm|entrance|ly|cdm|emptty'
1.1) Installation
Software Install:
#!/bin/bash
sudo apt update
sudo apt install x11vnc
1.2) Create a global VNC password (recommended)
Create a root-owned password file so your VNC server can use the password for access, file location is user defined:
#!/bin/bash
sudo x11vnc -storepasswd /etc/x11vnc.pass
sudo chmod 644 /etc/x11vnc.pass
That creates /etc/x11vnc.pass that x11vnc can use with -rfbauth.
1.3) Quick manual test
Quick manual test (attach to current display :0), See following step for flags explanation as needed:
#!/bin/bash
# create password first (next section), then:
x11vnc -display :0 -rfbauth /etc/x11vnc.pass -forever -shared -noxdamage -rfbport 5900 -o /var/log/x11vnc.log -bg

# without the localhost for tested, now it should listening for 0.0.0.0 addresses.
Now service should be up and running, we can run command: sudo ss -tulpn to confirm the 0.0.0.0:5900 is listening.
Now we can using the VNC client to test the connection, when finish, we can stop the service to continue.
#!/bin/bash
x11vnc -display :0 -rfbauth /etc/x11vnc.pass stop   # try the following commands if needed: x11vnc -R stop
Please ran the command sudo ss -tulpn to confirm the port has been stopped.
1.4) Understand the important x11vnc flags — what they do (quick reference)
Below are the flags you’ll see in the examples. I list them so you know what each option does.
-auth <file|guess>
Path to the X authority file (Xauthority) that x11vnc uses to authenticate to the X server.-auth guesstries to locate the right file automatically. Use the display manager’s auth file (e.g.,/var/run/slimski.auth) for greeter access.-rfbauth <path>
Use this password file for VNC authentication (/etc/x11vnc.pass).-display :0
Which X display to attach to (the physical screen on most systems); It is usually 0, used command to check:ls /tmp/.X11-unix.-rfbport <port>
TCP port to listen on (default 5900). Example:-rfbport 5900.-forever
Don’t exit after the first client disconnects — keep serving future clients.-shared
Allow multiple VNC clients to view/control at the same time.-noxdamage
Avoid certain X damage extensions that may cause drawing glitches on some setups.-localhost
Bind the VNC socket to loopback (127.0.0.1 and ::1) only — use this when you will SSH tunnel in. (Preferred way to lock VNC to the local host.)-bg
Background the process (don’t use this when the supervisor expects x11vnc in the foreground).-o <logfile>
Log file path for x11vnc output.-repeat
Improve keyboard autorepeat handling for remote keyboard events.-shared -noxdamage -repeat -forever
Common safe bundle for persistent greeter usage.-storepasswd(run interactively)
Create anrfbauthstyle password store.
(For more flags and details, read the x11vnc man page, following steps will be using some of those flags.)
2. Specific Distro x11VNC Configuration: antiX Linux - sysVinit + slimski:
This is the approach I used and tested on antiX-base Linux (sysVinit flavor) with slimski as the display manager. It watches for the greeter X socket and the slimski authfile and restarts x11vnc whenever X restarts (so it remains available across logout/login and as well as reboot - using 2.1 step only ).
2.1) Supervisor script: /usr/local/sbin/x11vnc-supervisor.sh
Create the file as root and paste:
#!/bin/sh
sudo nano /usr/local/sbin/x11vnc-supervisor.sh
#!/bin/sh
# x11vnc-supervisor.sh
# Supervisor loop: wait for X and auth, run x11vnc in foreground, restart if it exits.
SUPERVISOR_LOG=/var/log/x11vnc-supervisor.log
XSOCKET=/tmp/.X11-unix/X0
SLIMSKI_AUTH=/var/run/slimski.auth # adjust if your auth path differs
PASSFILE=/etc/x11vnc.pass
DISPLAY=:0
X11VNC=/usr/bin/x11vnc
# x11vnc args run in foreground so we can restart it when it exits
X11VNC_ARGS="-auth ${SLIMSKI_AUTH} -rfbauth ${PASSFILE} -forever -shared -noxdamage -localhost -display ${DISPLAY} -rfbport 5900 -o /var/log/x11vnc.log"
logger() {
printf "%s %s\n" "$(date '+%F %T')" "$*" >> "${SUPERVISOR_LOG}"
}
# Main loop
logger "x11vnc-supervisor starting"
while true; do
# wait until X socket exists and auth file exists
i=0
while [ $i -lt 60 ]; do
if [ -e "${XSOCKET}" ] && [ -e "${SLIMSKI_AUTH}" ]; then
break
fi
i=$((i+1))
sleep 1
done
if [ ! -e "${XSOCKET}" ] || [ ! -e "${SLIMSKI_AUTH}" ]; then
logger "Timeout waiting for X or auth; sleeping 5s and retrying"
sleep 5
continue
fi
logger "Found X socket and auth; starting x11vnc"
# Run x11vnc in foreground (no -bg) so when it exits we can restart it
# Use exec to capture exit status? we want to loop so do not exec
"${X11VNC}" ${X11VNC_ARGS}
rc=$?
logger "x11vnc exited with code ${rc}; sleeping 2s before restart"
sleep 2
done
Make it executable:
#!/bin/sh
sudo chmod 755 /usr/local/sbin/x11vnc-supervisor.sh
2.2) Init script (SysV): /etc/init.d/x11vnc create init service:
Create this file and paste as root:
#!/bin/sh
sudo nano /etc/init.d/x11vnc
#!/bin/sh
### BEGIN INIT INFO
# Provides: x11vnc
# Required-Start: $remote_fs $syslog
# Required-Stop: $remote_fs $syslog
# Default-Start: 2 3 4 5
# Default-Stop: 0 1 6
# Short-Description: Start x11vnc supervisor for slimski greeter
### END INIT INFO
PATH=/sbin:/usr/sbin:/bin:/usr/bin
SUPERVISOR=/usr/local/sbin/x11vnc-supervisor.sh
PIDFILE=/var/run/x11vnc-supervisor.pid
LOG=/var/log/x11vnc-supervisor.log
case "$1" in
start)
echo "Starting x11vnc-supervisor..."
if [ -e "${PIDFILE}" ] && kill -0 "$(cat ${PIDFILE})" 2>/dev/null; then
echo "Supervisor already running (pid $(cat ${PIDFILE}))"
exit 0
fi
start-stop-daemon --start --background --make-pidfile --pidfile ${PIDFILE} --startas /bin/sh -- -c "${SUPERVISOR} & echo \$! > ${PIDFILE}"
sleep 1
echo "Started"
;;
stop)
echo "Stopping x11vnc-supervisor..."
if [ -e "${PIDFILE}" ]; then
kill "$(cat ${PIDFILE})" 2>/dev/null || true
rm -f "${PIDFILE}"
echo "Stopped"
else
echo "No pidfile, nothing to stop"
fi
;;
restart|force-reload)
$0 stop
sleep 1
$0 start
;;
status)
if [ -e "${PIDFILE}" ] && kill -0 "$(cat ${PIDFILE})" 2>/dev/null; then
echo "x11vnc-supervisor running (pid $(cat ${PIDFILE}))"
else
echo "x11vnc-supervisor not running"
exit 1
fi
;;
*)
echo "Usage: $0 {start|stop|restart|status}"
exit 2
;;
esac
exit 0Make it executable and enable at boot:
#!/bin/sh
sudo chmod +x /etc/init.d/x11vnc
sudo update-rc.d x11vnc defaults
sudo /etc/init.d/x11vnc start
Check supervisor log:
#!/bin/sh
sudo tail -n 200 /var/log/x11vnc-supervisor.log
sudo tail -n 200 /var/log/x11vnc.log
Preferred: add -localhost to your x11vnc args (see supervisor & unit examples above). That makes x11vnc accept only local connections. Verify:
#!/bin/sh
ss -tlnp | grep 5900
# expected: 127.0.0.1:5900  or ::1:5900 (NOT 0.0.0.0)
Notes:
- If your slimski auth file path is different, find it with
sudo find /run /var/run /tmp -maxdepth 3 -type f -name '*slimski*' -o -name '*Xauthority*'and updateSLIMSKI_AUTHin the supervisor. - Before move on to the SSH tunnel test step, please reboot the system.
2.3) Optional: Using the login auto start file method (Only work after login)
Global (All Sessions): Use ~/.desktop-session/startup (Recommended and tested )
#!/bin/sh
nano ~/.desktop-session/startup
Add the following command in the end of the file:
x11vnc -display :0 -rfbauth /etc/x11vnc.pass -forever -localhost -shared -noxdamage -rfbport 5900 -o /var/log/x11vnc.log -bg &Window Manager Specific: If you only want an app to start when using a specific environment:
Fluxbox: ~/.fluxbox/startup
IceWM: ~/.icewm/startup
JWM: ~/.jwm/startup
#!/bin/sh
# If you are using any of the following window manager, edited the file accordingly:
nano ~/.fluxbox/startup
nano ~/.icewm/startup
nano ~/.jwm/startup
Now the command will execute for every time we log in.
3. Specific Distro x11VNC Configuration: systemd Based Systems - systemd + lightdm:
3.1) Install LightDM
For it continue to work after we rebooted, please install LightDM as much as possible to ensure a consistent X11 session is created at boot that x11vnc can attach to as a service:
#!/bin/sh
sudo apt install lightdm
You will be likely to see the following pop-up, select the LightDM to confirm:

If you need to switch to a different display manager, use the following commands:
#!/bin/sh
sudo dpkg-reconfigure gdm3  # For GDM3 DM
sudo dpkg-reconfigure lightdm  # For LightDM
3.2) Minimal systemd unit example
If you run a systemd distro (Ubuntu / Linux Mint / Most Debian with systemd), you can use a systemd service unit.
#!/bin/sh
sudo nano /lib/systemd/system/x11vnc.service
[Unit]
Description=x11vnc service
After=display-manager.service network.target syslog.target
[Service]
Type=simple
ExecStart=/usr/bin/x11vnc -forever -display :0 -auth guess -rfbauth /etc/x11vnc.pass -localhost -shared -noxdamage -rfbport 5900 -o /var/log/x11vnc.log
ExecStop=/usr/bin/killall x11vnc
Restart=on-failure
[Install]
WantedBy=multi-user.target
What each line means:
- [Unit] / Description — human-readable name for the service.
- After=display-manager.service network.target syslog.target — tells systemd to start this service after the display manager and basic system networking/logging reach their targets; it ensures the X greeter is available first.
- [Service] / Type=simple — systemd assumes the process started by
ExecStartis the main process (no forking tracking). - ExecStart=… — the exact command systemd runs to start x11vnc. In the example we tell x11vnc to attach to
:0, use-auth guessto locate the X authority automatically (or replace with the explicit path for your DM), and supply a password. - ExecStop=/usr/bin/killall x11vnc — what systemd will run to stop the server (a simple kill-all in the example). You can change this to a more precise
killor wrapper if you prefer graceful shutdown. - Restart=on-failure — if x11vnc crashes or exits with an error, systemd will restart it automatically.
- [Install] / WantedBy=multi-user.target — makes the service start in normal multi-user mode (so enabling it integrates it into the boot graph).
Enable & start:
#!/bin/sh
sudo systemctl daemon-reload
sudo systemctl enable --now x11vnc.service
sudo systemctl status x11vnc.service
Reboot and confirm you can connect to the login screen (the display manager).
Tip: -auth guess also works in many cases, but explicit path reduces guesswork. replace with the display manager’s actual Xauthority path for your system (GDM, SDDM, LightDM paths differ) if needed.
4. Test: SSH tunneling — how to connect securely
From your remote client:
ssh -L 127.0.0.1:5900:127.0.0.1:5900 youruser@Linux-Server-Host

# On your local machine after the tunnel is up:
# use the vncviewer to connect to 127.0.0.1:5900
If you’ve changed the port, adjust the -L accordingly.
5. Known issues and common gotchas
5.1) Common gotchas:
- No X display :0 — the display manager might use
:1or restart X on logout. The supervisor solves this by watching/tmp/.X11-unix/X0. Usels -l /tmp/.X11-unixto see sockets. - Auth file not found — check the display manager config for its
authfile(lightdm, gdm, slimski all differ). Uselsof -p <XorgPID>to find which Xauthority is used. - Wayland — x11vnc works with Xorg server only. If your greeter uses Wayland, either switch the display server to Xorg or use a Wayland-compatible remote desktop (RDP or compositor-specific sharing).
- x11vnc prints strange errors — inspect
/var/log/x11vnc.logand/var/log/x11vnc-supervisor.log. The supervisor will log exit codes and restarts. - Service starts but no greeter — ensure
After=display-manager.service(systemd) or the SysV script waits for the X socket and auth file before starting.
5.2) Known issues with the lock screen program:
On antiX linux with sysVinit + slimski configuration:
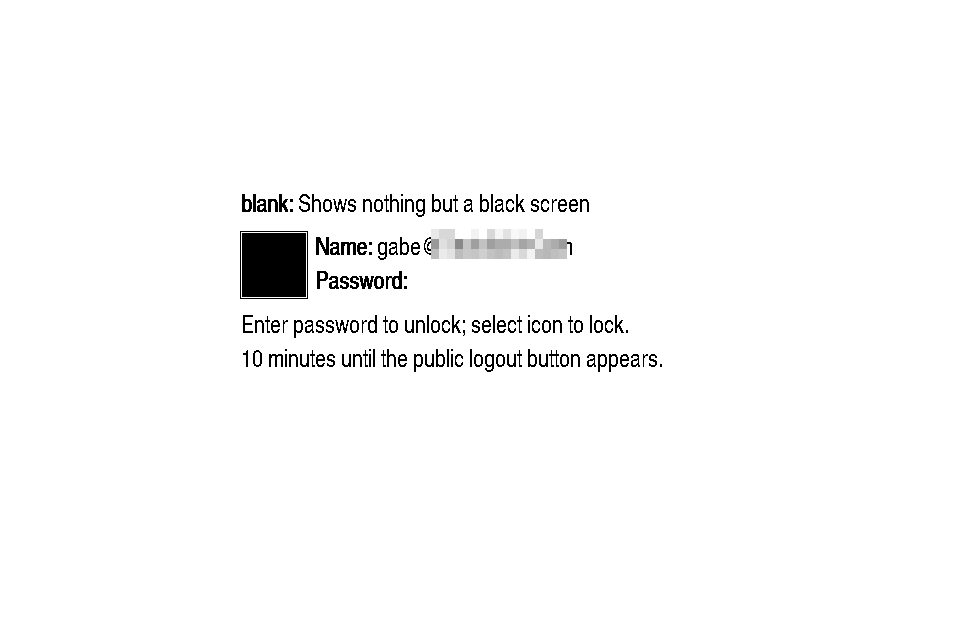
At least for the system that I have tested, after screen lock, and as you can see the follow image and then I can unlock it again on resume, the only configuration that I tested with completely unattended scenario:
On a systemd systems + lightdm configuration issue:
LightDM + a session locker (often light-locker, gnome-screensaver, or similar) will take exclusive control of the display / X session or switch the screen into a different drawable state that some VNC servers (including x11vnc) can’t read while the locker is active — causing a black screen for remote VNC viewers. This also happens when you try to switch a user from the GUI too. In some cases: light-locker switches to :1 when locking, so that explains why the VNC server running on :0 only sees a black screen, it is worth trying to start another vnc server at :1, and than swith to :0 again, example command: x11vnc -auth /var/run/lightdm/root/\:1 -display :1 . At the time when I tested, when the screen lock happened, I am mostly had to reboot the system and login again remotely.
Here is few other alternative:
Option 1 — Disable light-locker or the issue screensaver with xscreensaver: xscreensaver is X11-friendly, can lock on resume, and tends to keep the framebuffer in a state x11vnc can read (no black screen). It also provides a GUI preferences tool so you can explicitly enable “Lock screen when screensaver is active” / “Lock on resume” for security.
Command may vary for an disable your screensaver , but the following are the command for xscreensaver installation:
#!/bin/sh
sudo apt update
sudo apt install xscreensaver xscreensaver-gl-extra xscreensaver-data-extra
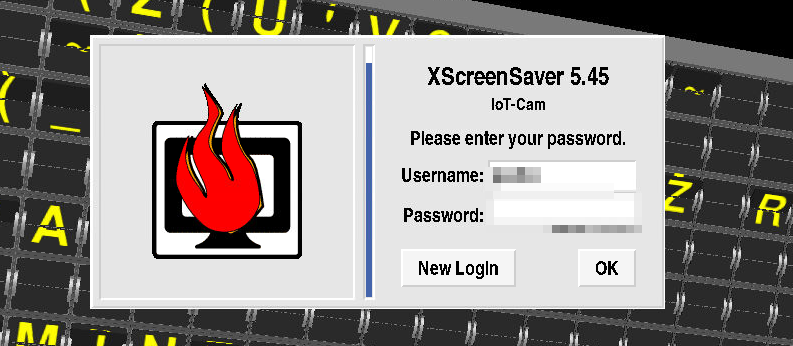
Example login screen for the screen saver over VNC:
Note: do not click "New Login" in the screen, as that we will switch a black screen.
Option 2 — Disable lock screen entirely (Maybe recommend it for kiosk mode) : If the box is a kiosk (physical access is limited/trusted), disabling any session locker avoids the black screen. Not recommended if you need security, but sometimes acceptable for kiosks, this method can be done in a GUI environment, most likely will be under power management.
The following command is another way to block lock screen or sleep mode, If you want to making sure the computer screen never go to sleep, so it can keep your TV or monitor always on and can be VNC later; add the following command into the Linux startup file:
# Example command:
xset -dpms; xset s off &

# or the following:
xset dpms 0 0 0 && xset s noblank  && xset s off &
Or you can edit the xorg config file:
#!/bin/sh
# edit a file: sudo nano /etc/X11/xorg.conf.d/10-noblank.conf
# Add the following lines
Section "ServerFlags"
Option "BlankTime" "0"
Option "StandbyTime" "0"
Option "SuspendTime" "0"
Option "OffTime" "0"
EndSection
Note: If you want to be completely kiosk mode, may needed to enable user auto login as well, such as /etc/lightdm/lightdm.conf or in the GUI settings.
6. Securities Checklist and Reminder.
- Use
-localhostand SSH tunnels (or VPN); do not expose 5900 publicly. - Use a a
x11vncpassword for file/etc/x11vnc.passas much as possible. - Restrict SSH to key-based auth and disable root remote password login for public Linux host
7. Other Related Programs
Although this post focuses on x11VNC for X11-based systems, you may also be interested in the following alternatives:
- wayvnc – A VNC server designed for Wayland compositors (non-X11 display servers). Ideal if your system is running Wayland instead of X11.
- Sunshine – A self-hosted game and desktop streaming server that works with Moonlight clients, offering high-performance remote access.
- RustDesk – A modern, easy-to-use remote desktop solution for Linux that does not require traditional VNC configuration and can be simpler to set up, and it is a well documented program on the official site.
8. Appendix - Related to current article
🖥️ 8.1) Desktop Environments (DEs) — Full Graphical Experiences
A desktop environment is a bundled suite that provides a complete graphical interface: panels/taskbars, file managers, system settings tools, default applications (terminal, text editor, media apps), and its own window manager. It’s the most user-friendly, cohesive option.
Major Desktop Environments Example:
- GNOME – Modern, activity-based workflow with a focus on simplicity and accessibility.
- KDE Plasma – Highly customizable, feature-rich; integrates tightly with Qt apps.
- Xfce – Lightweight and stable, ideal for older hardware.
- Cinnamon – Traditional “Windows-like” desktop from Linux Mint.
- MATE – Continuation of the classic GNOME 2 experience.
- LXQt – Lightweight Qt-based environment (successor to LXDE).
- LXDE – Extremely lightweight DE (GTK2-based).
- Budgie – Modern, simple DE originally from Solus.
- Pantheon – Elegant DE from elementary OS with a macOS-ish feel.
- Deepin Desktop – Visually polished DE from Deepin Linux.
- COSMIC / Unity / Trinity – Other variants and forks of major DEs or design experiments.
Here is a list of DE from Arch Linux wiki: https://wiki.archlinux.org/title/Desktop_environment, and a Comparison & List of Desktop Environments from eylenburg: https://eylenburg.github.io/de_comparison.htm
Each DE usually comes with its own default window manager, example:
- GNOME → Mutter
- KDE Plasma → KWin
- Xfce → Xfwm
- Cinnamon → Muffin
- MATE → Marco
🔐 8.2) Display Managers (DMs) — Login / Session Selectors
A display manager is what you see first when the system boots into graphics: the graphical login screen. It authenticates you and then starts your chosen DE or WM session. Because they present the login UI and session chooser, they’re sometimes casually called login managers.
Common Display Managers
- GDM – GNOME Display Manager (default for GNOME).
- SDDM – Simple Desktop Display Manager (used by KDE, LXQt, etc.).
- LightDM – Lightweight, flexible, supports many greeters/themes.
- LXDM – Lightweight DM for LXDE.
- XDM – Original, basic display manager from X11.
- Slim – Simple Login Manager (minimal).
- WDM – Window Maker display manager.
- greetd – Minimal, scriptable greeter.
- nodm – Auto-login manager (no prompt).
👉 A display manager doesn’t manage windows or desktops — it simply handles login and launching your session. After that, the DE or WM takes over.
🪟 8.3) Window Managers (WMs) — Window Placement & Behavior
Window managers control how individual application windows behave: how they’re placed, resized, decorated (title bars), focused, and sometimes animated. A DE includes a WM, but you can also use WMs standalone without a full DE.
There are two major WM categories:
🌀 Stacking / Floating WMs
Windows overlap and can be moved freely — familiar for most GUI users.
Examples:
- Openbox – Highly configurable lightweight WM
- Fluxbox – Minimal, fast (fork of Blackbox)
- IceWM – Lightweight with taskbar, themes
- Window Maker – Classic NeXT-style interface, lightweight
- Moksha – Enlightenment fork with DE-like panel features
🔳 Tiling / Dynamic WMs
Windows are arranged in non-overlapping layouts automatically — great for keyboard users and power users.
Examples:
- i3 – Popular tiling WM with plain-text config
- Sway – i3-style tiler for Wayland
- xmonad – Haskell-configurable tiling manager
- awesomewm – Lua scriptable tiling WM
- bspwm / herbstluftwm / spectrwm / dwm – Other popular tilers
8.4) Compositors
Some modern WMs also composite (draw shadows, transparency, animations). E.g., Enlightenment is both a WM and compositing shell.
🧠 8.5) How They Fit Together
Here’s a simplified stack of components:
Display Server (Xorg / Wayland)
        ↓
Display Manager (login screen)
        ↓
Desktop Environment (GNOME, KDE, etc.)
        → includes a Window Manager
   OR
Window Manager standalone (i3, Openbox, etc.)
- The display server (Xorg or Wayland) talks to hardware.
- The display manager starts the session and shows login.
- The desktop environment is a full UI with apps + panel + settings.
- The window manager handles window behavior, either as part of a DE or by itself.
📌 8.6) Summary (Quick Views)
| Component | Purpose | Examples |
|---|---|---|
| Desktop Environment | Full GUI suite | GNOME, KDE Plasma, Xfce, Cinnamon, MATE, Budgie |
| Display Manager | Login/session chooser | GDM, SDDM, LightDM, LXDM, XDM |
| Window Manager | Window placement/behavior | i3, Openbox, Fluxbox, Sway, xmonad |
Comments NOTHING