



Introduction
Policy-Based Routing (PBR) lets you direct traffic from specific VLANs through a chosen WAN gateway — in this case, a WireGuard VPN tunnel — rather than following the default routing table. As a result, this approach is enormously powerful in a segmented home or office network: your IoT devices, guest VLAN, or privacy-sensitive clients all route through Proton VPN (Or any other WireGuardVPN peers) at the router level, without installing any client software on end devices.
In this guide, you will walk through the full configuration of Proton VPN's WireGuard protocol on pfSense 2.7.x. In addition to the core setup, the guide also covers:
- Per-VLAN policy-based routing via WireGuard gateway
- Dual-stack IPv4 + IPv6 (ULA-based) through the VPN tunnel
- Manual NAT for both IPv4 and IPv6
- DHCP-delivered DNS that prevents leaks
- Scaling to multiple WireGuard tunnels for additional VLANs
Step 1 — Generate a WireGuard Configuration from Proton VPN
First, sign in to your Proton account at account.protonvpn.com and navigate to Downloads → WireGuard configuration. When prompted, choose Platform: Router. Next, select the target server (or let Proton choose the fastest one) and download the .conf file.
Once you have the file, open it with any text editor. You will need the following values for the pfSense setup:
| Field | What to look for |
| PrivateKey | Your unique private key — keep this secret |
| Address | 10.2.0.2/32 (your VPN tunnel IPv4 address) |
| Endpoint IP | The numeric IP address on the Endpoint = line (e.g. 79.127.184.216) |
| PublicKey (Peer) | The server's public key under the [Peer] section |
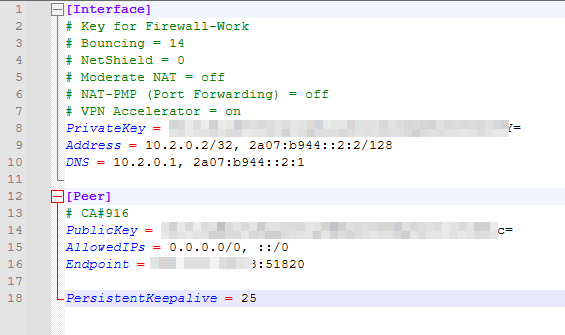
For reference, a standard Proton VPN WireGuard config for a router looks like this:
[Interface]
PrivateKey = <your-private-key>
Address    = 10.2.0.2/32
DNS        = 10.2.0.1

[Peer]
PublicKey  = <server-public-key>
Endpoint   = <server-ip>:51820
AllowedIPs = 0.0.0.0/0
Then, with help of this guide from mikaeldui user at Github, I edited it for IPv6:
Step 2 — Install the WireGuard Package (If not already)
To begin, log in to your pfSense web interface (default: 192.168.1.1). Then navigate to System → Package Manager → Available Packages. Search for wireguard and click Install next to the WireGuard package. Wait for the installation to finish.
Afterward, go to System → Package Manager → Installed Packages and confirm that WireGuard appears in the list. Once confirmed, the VPN menu gains a new WireGuard entry, which you will use in the next step.
Step 3 — Create the WireGuard Tunnel
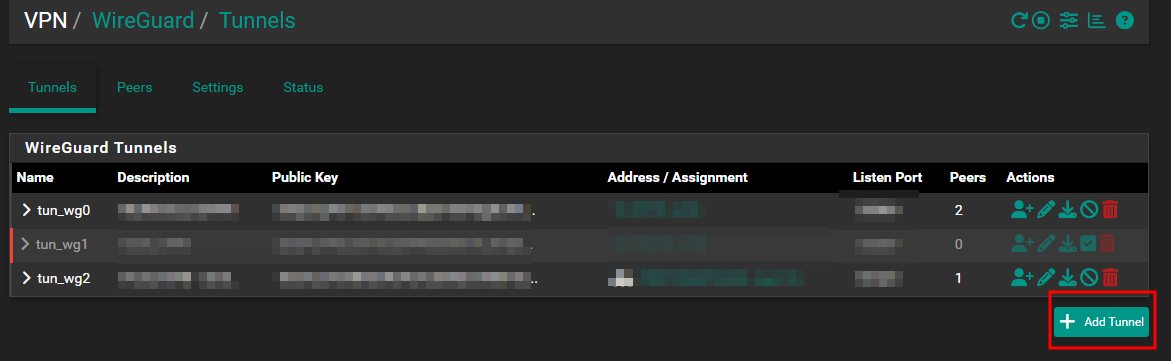
Now go to VPN → WireGuard → Tunnels and click Add Tunnel. Configure the tunnel with the following settings:
| Setting | Value |
| Description | ProtonVPN_Work (or any descriptive label) |
| Listen Port | <Left it empty> |
| Private Key | Paste the PrivateKey value from your downloaded .conf file |
| Public Key | Auto-generated — Based on the PrivateKey |
| Interface Address (IPv4) | 10.2.0.2/32 |
| Interface Address (IPv6) | 2a07:b944::2:2/128 (add this for IPv6 dual-stack) |
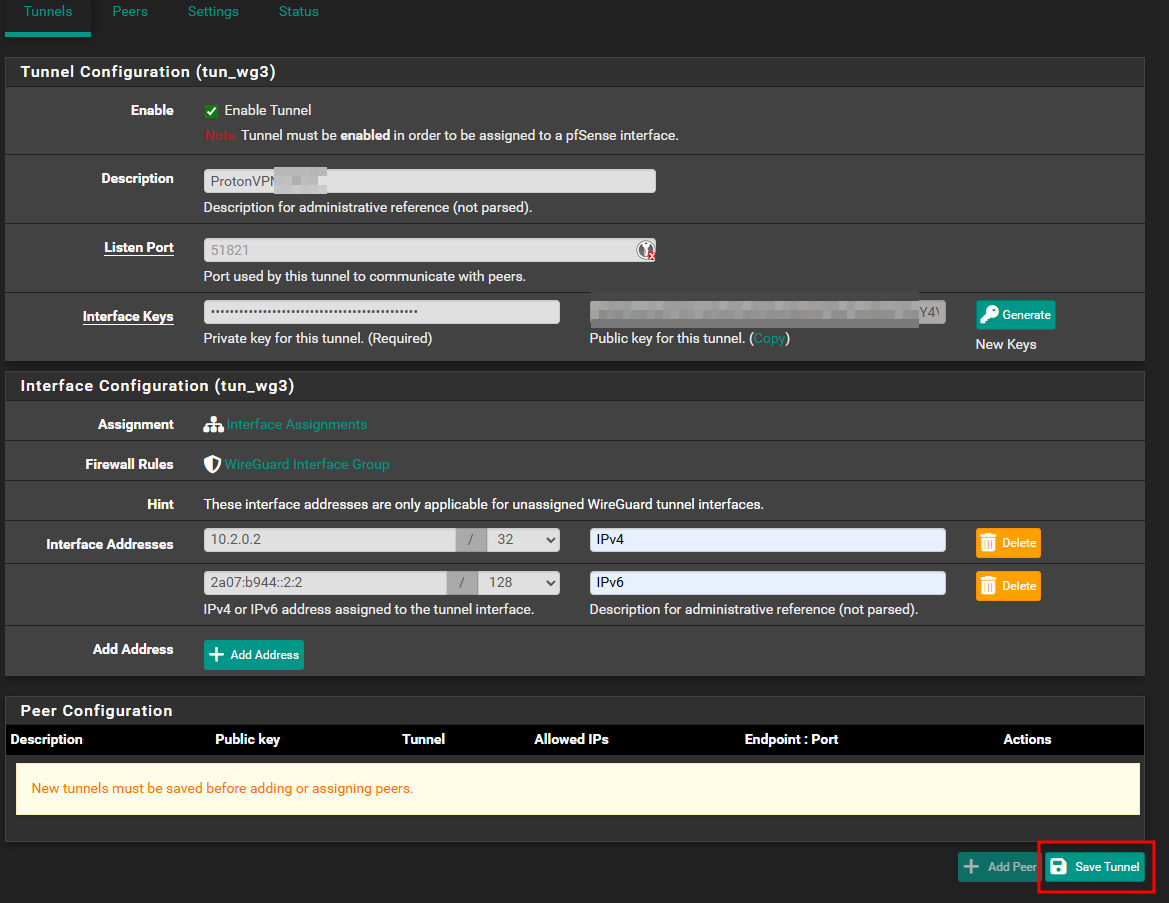
Click Save Tunnel when done.
Step 4 — Add the WireGuard Peer
Still on the Tunnels page, click Add Peer (or go to VPN → WireGuard → Peers → Add). Then enter the following:
| Setting | Value |
| Tunnel | Select the tunnel created in Step 3 |
| Description | Server name or location (e.g. USA#60) |
| Dynamic Endpoint | Uncheck |
| Endpoint | IP address from the Endpoint = line in your .conf (numeric only, no port) |
| Port | 51820 |
| Keep Alive | 25 |
| Public Key | Server's PublicKey from the [Peer] section of your .conf file |
| Allowed IPs (IPv4) | 0.0.0.0/0 |
| Allowed IPs (IPv6) | ::/0 (add for IPv6 dual-stack) |
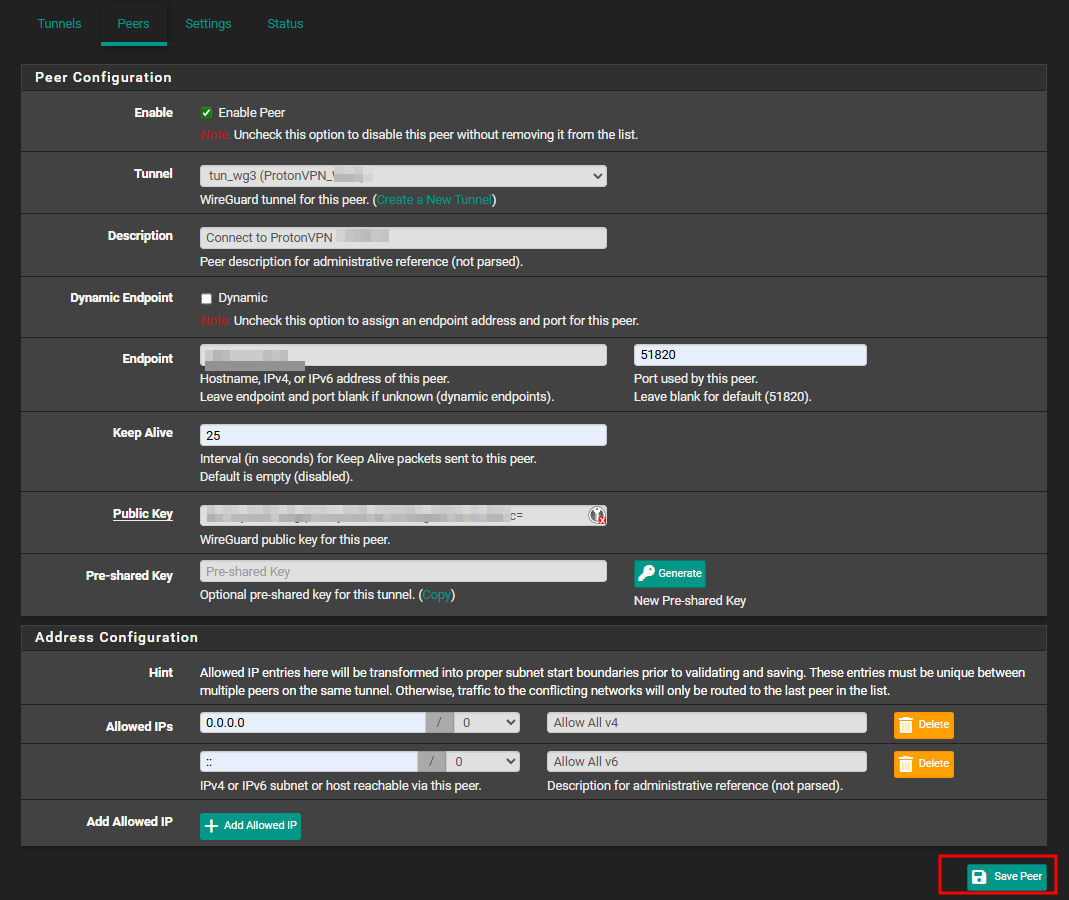
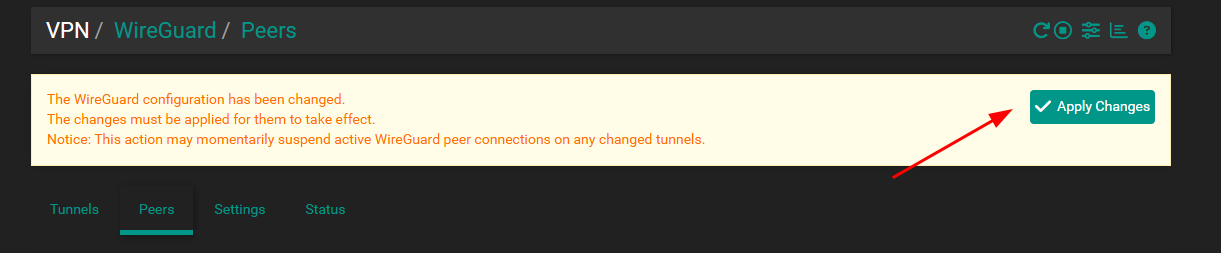
If you had not already done it, click Save Peer. Then go to the Settings tab, check Enable WireGuard, and click Save → Apply Changes.
Step 5 — Create the WireGuard Interface Assignment
Although the WireGuard package creates a virtual network interface (such as tun_wg3), it does not automatically assign it as a routable pfSense interface. Therefore, you need to assign it manually.
Navigate to Interfaces → Interface Assignments. In the Available network ports dropdown, select tun_wg3 and click Add. A new interface will appear — typically OPT1 or the next available OPT number. Click on that newly listed interface name to configure it.

| Setting | Value |
| Enable | Checked |
| Description | ProtonVPN (or similar) |
| IPv4 Configuration Type | Static IPv4 |
| IPv4 Address | 10.2.0.2 / 32 |
| IPv6 Configuration Type | Static IPv6 |
| IPv6 Address | 2a07:b944::2:2 / 128 |
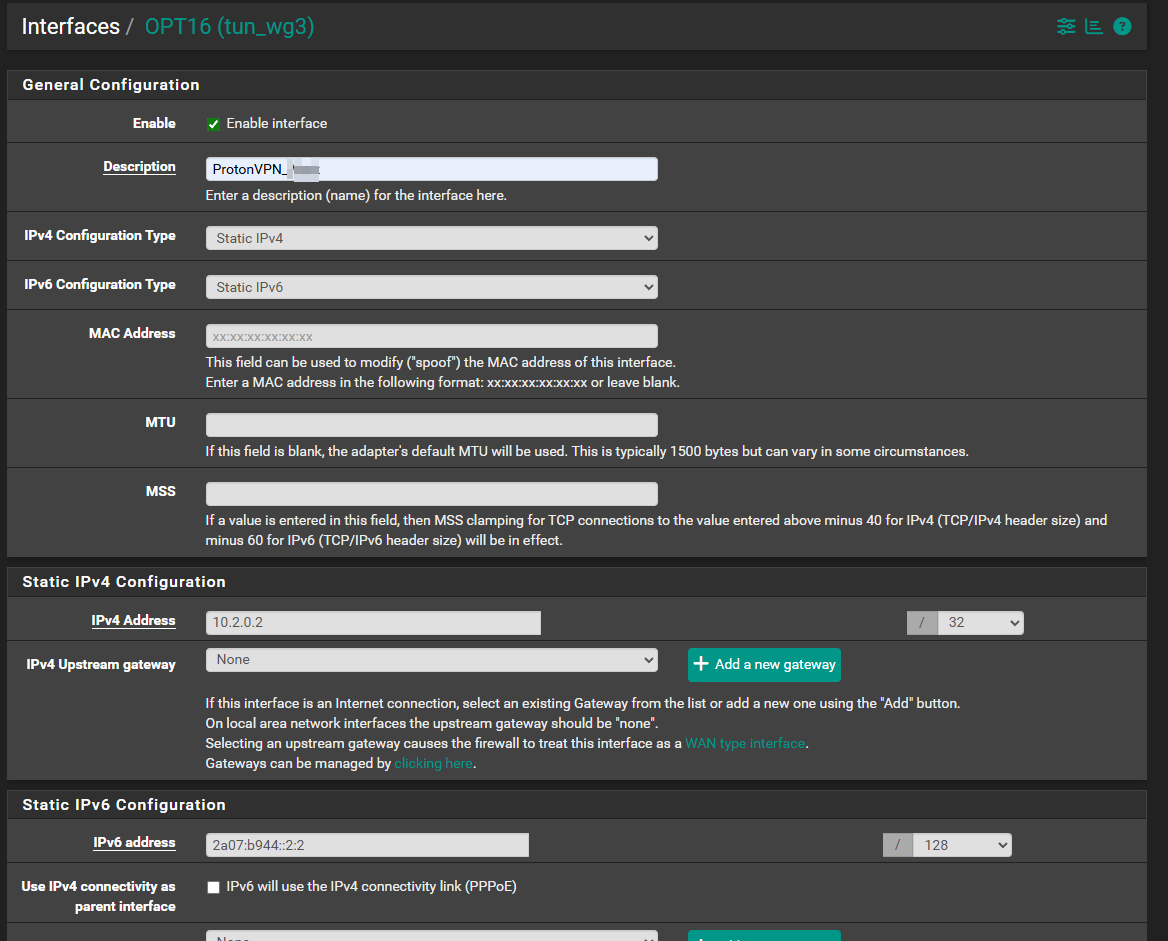
Click Save, then Apply Changes. For the rest of this guide, this interface will be OPT_VPN — substitute your actual interface name (e.g. OPT1) wherever you see it.
Step 6 — Add Gateways
IPv4 Gateway
Go to System → Routing → Gateways and click Add. Configure the IPv4 gateway as follows:
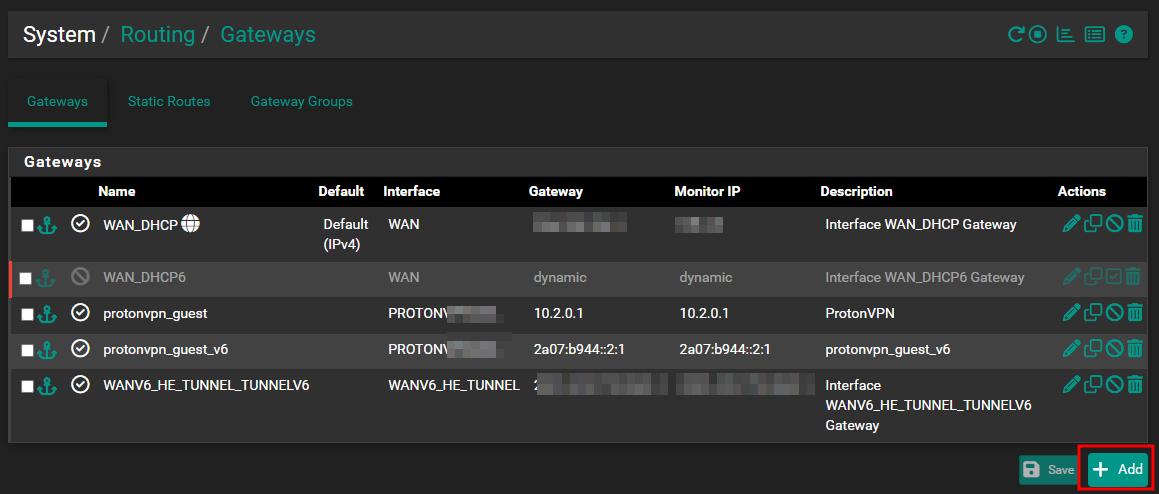
| Setting | Value |
| Interface | OPT_VPN (your WireGuard interface) |
| Address Family | IPv4 |
| Name | GW_PROTONVPN (descriptive name) |
| Gateway | 10.2.0.1 |
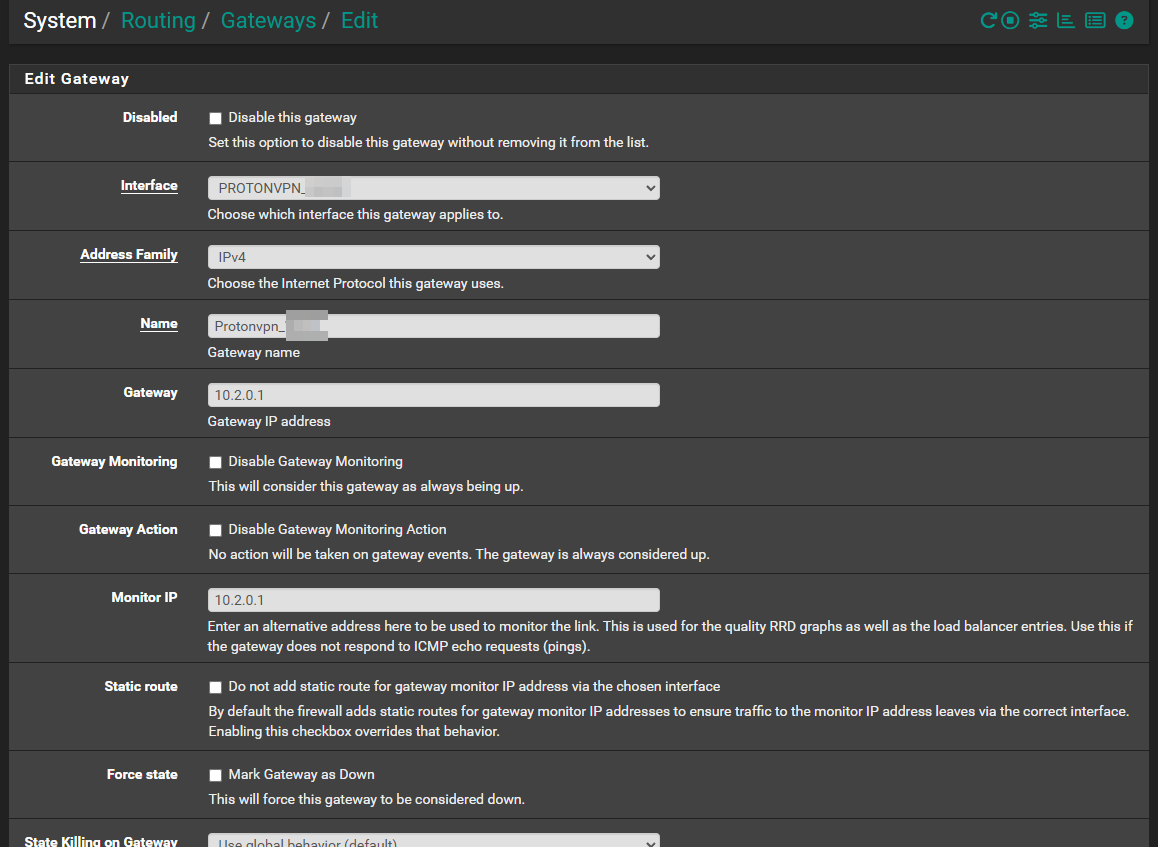
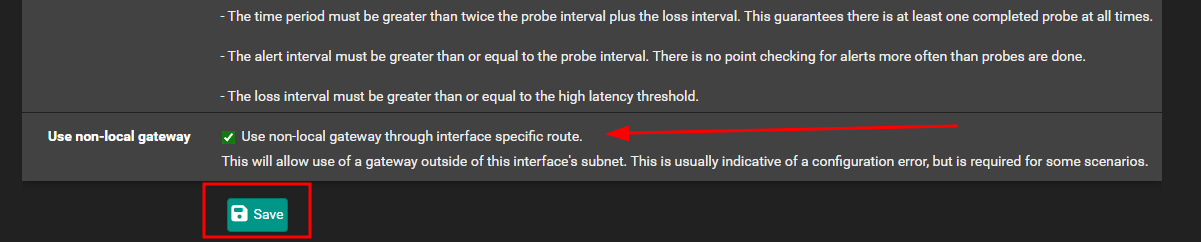
Next, click Display Advanced and check Use non-local gateway → Use non-local gateway through interface specific route. This step is critical — without it, pfSense refuses to route through the WireGuard tunnel, because 10.2.0.1 does not sit on a directly connected subnet. Finally, click Save and Apply Changes.


IPv6 Gateway
Click Add again to create a second gateway for IPv6:
| Setting | Value |
| Interface | OPT_VPN |
| Address Family | IPv6 |
| Name | GW_PROTONVPN_V6 (descriptive name) |
| Gateway | 2a07:b944::2:1 |
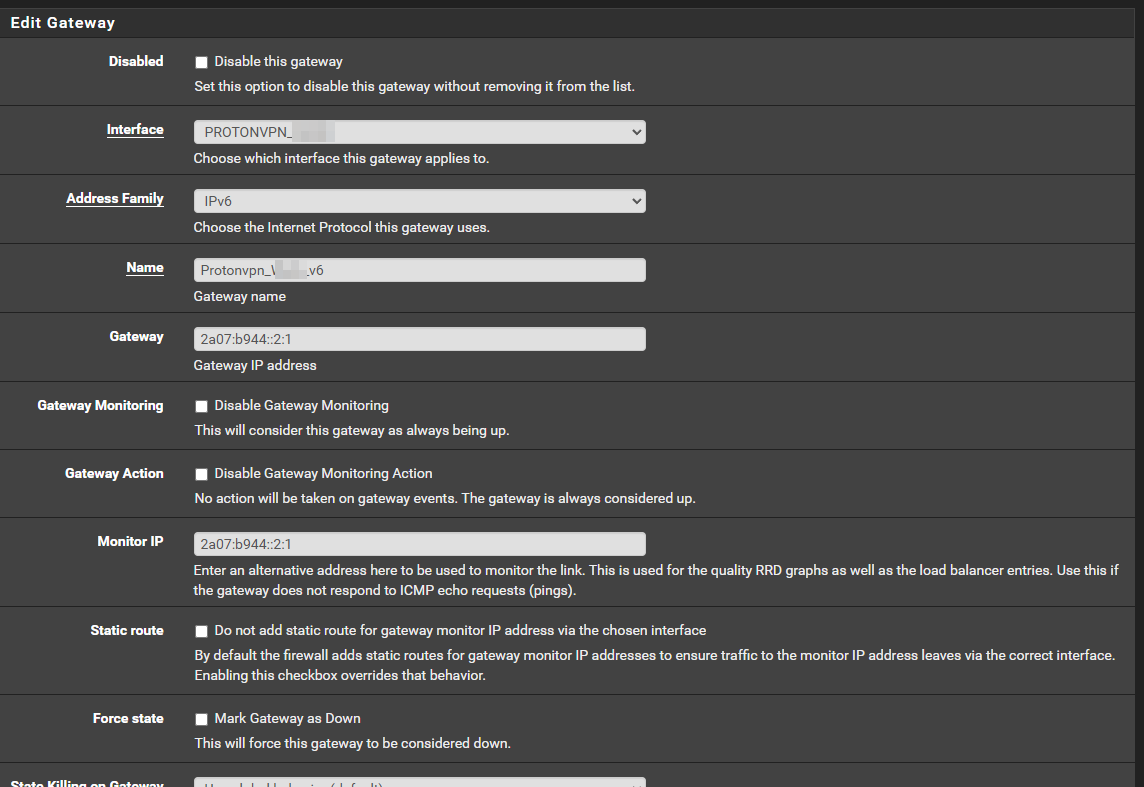
Again, click Display Advanced and check Use non-local gateway → Use non-local gateway through interface specific route. Then click Save and Apply Changes.
Step 7 — Configure Manual Outbound NAT
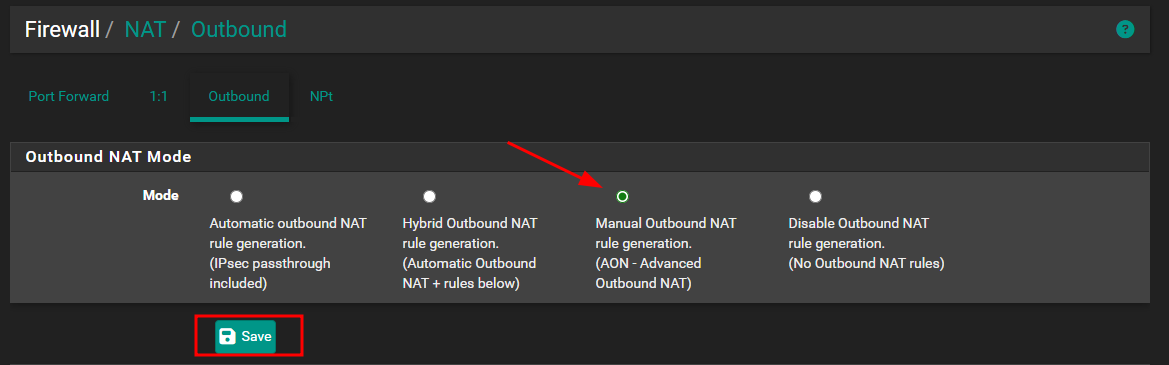
By default, pfSense relies on automatic NAT rules. However, to properly control NAT for policy-based routing through the WireGuard tunnel, you need to switch to Manual Outbound NAT.
Navigate to Firewall → NAT → Outbound. Change the mode to Manual Outbound NAT rule generation and click Save → Apply Changes.
Disable the Auto-Created OPT → WAN Rules
After switching to manual mode, pfSense automatically generates a set of rules. Locate and disable (click the checkmark icon) the following two rules:
- Auto created rule for ISAKMP — OPT_VPN to WAN
- Auto created rule — OPT_VPN to WAN

Edit the LAN → WAN Rules to Point to the VPN Interface
Next, find and edit (click the pencil icon) these two rules:
- Auto created rule — LAN to WAN
- Auto created rule for ISAKMP — LAN to WAN

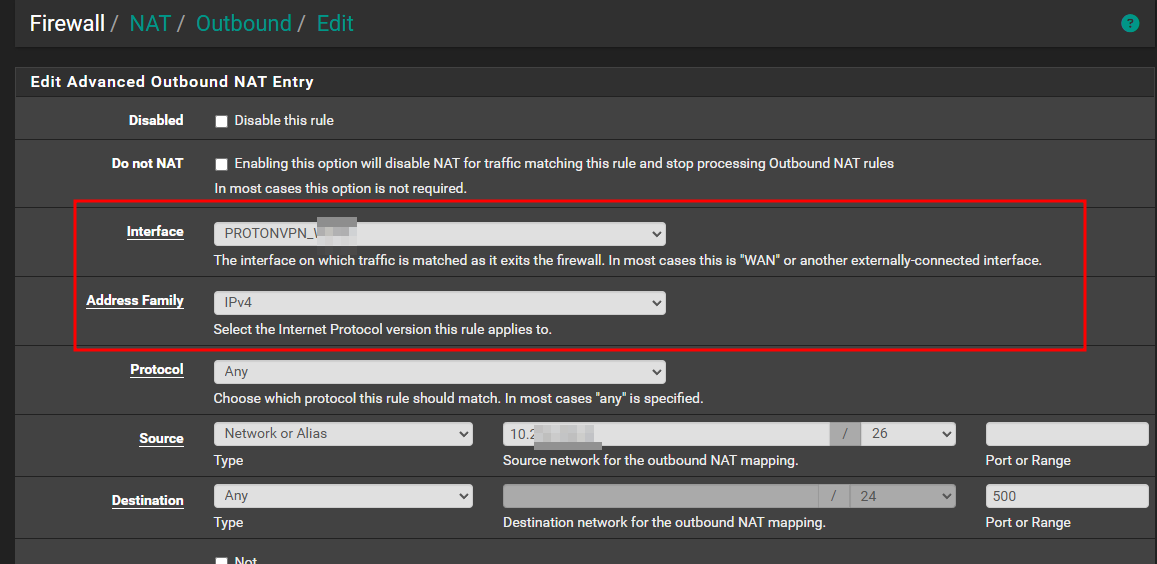
In both cases, change the Interface to OPT_VPN and the Address Family to IPv4. Then click Save and Apply Changes.
Add IPv6 Manual NAT Rules
This step is often overlooked, yet it is essential for a working dual-stack setup. You need to add outbound NAT rules for IPv6 traffic that routes through the WireGuard interface. Specifically, add the following rules:
- Source: your VLAN IPv6 subnet (using your ULA prefix), Interface: OPT_VPN, Translation: Interface Address — for IPv6
- Repeat for each VLAN subnet that will route through the VPN
Copy over the IPv4 Manual NAT Rules and edit to IPv6 NAT rules:

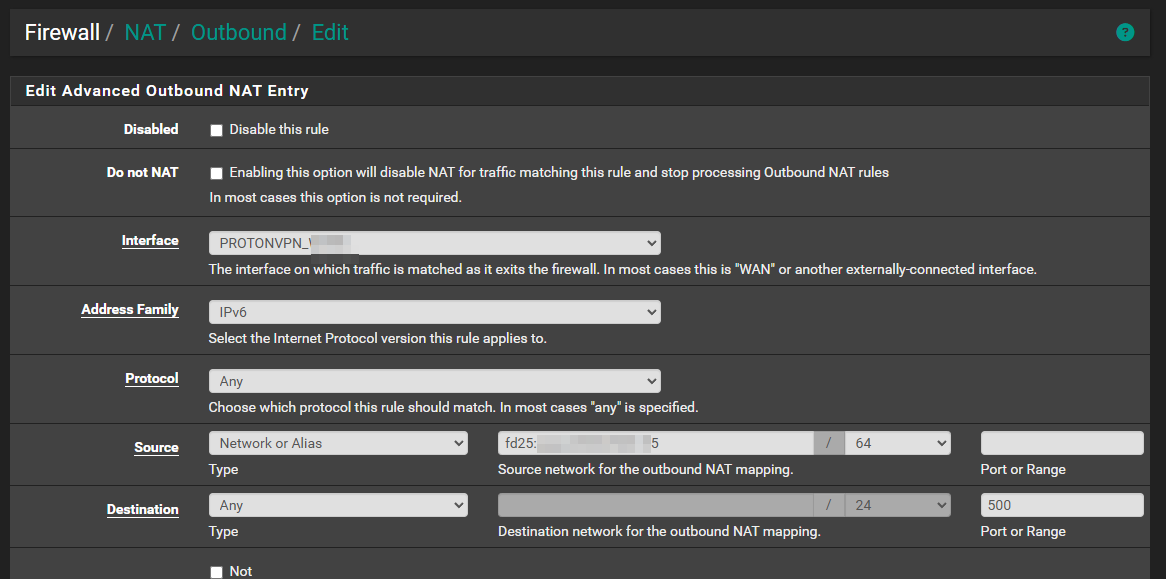
Here is the combination of IPv4 and IPv6 NAT rules looks like:

Step 8 — Firewall Rules for Policy-Based Routing
This is where the policy-based routing part actually takes effect. Rather than changing the default route for all traffic — which would break devices on non-VPN VLANs — you instead add a gateway override to specific VLAN firewall rules.
Assign the VPN Gateway on the VLAN Allow Rule
Go to Firewall → Rules → [Your VLAN interface tab] and locate (or create) the default allow rule for that VLAN — typically named "Default allow VLAN to any rule" or similar.
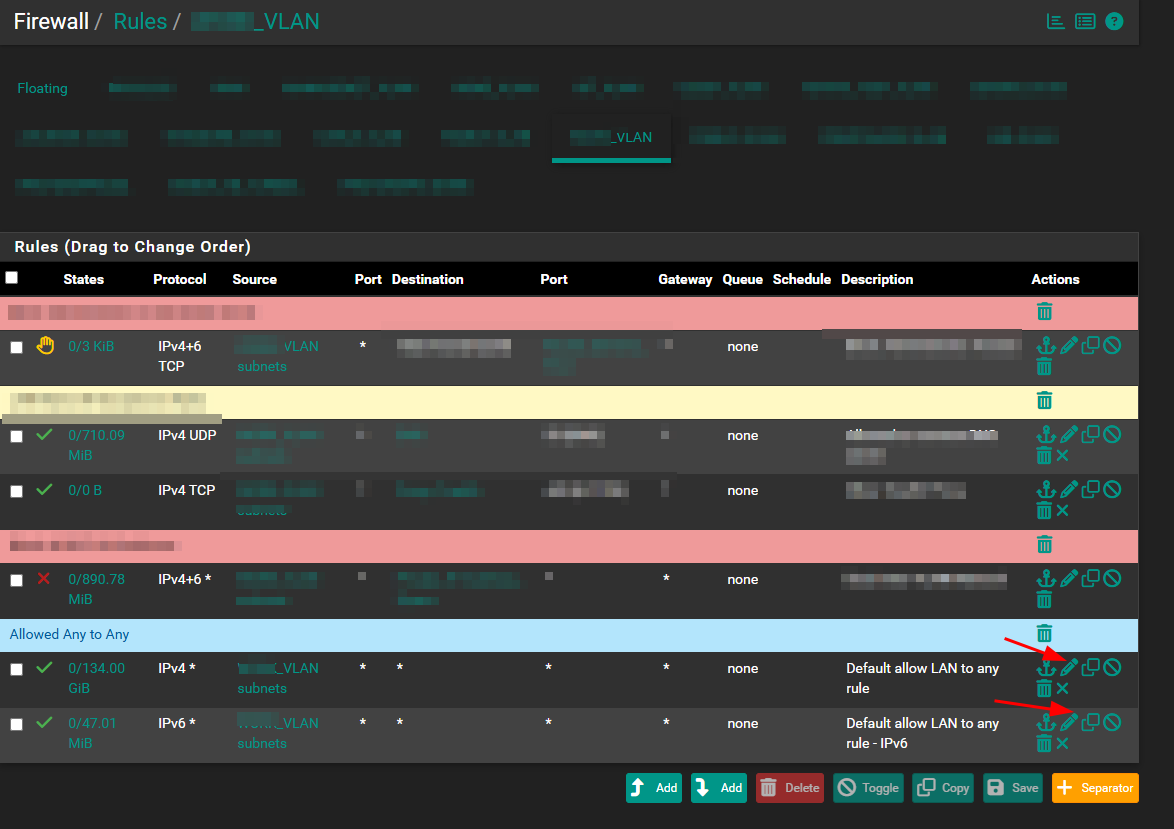
Click the pencil icon to edit it. Scroll down and click Display Advanced, then find the Gateway field. Change it from Default (or blank) to GW_PROTONVPN (your IPv4 VPN gateway). Finally, click Save and Apply Changes.
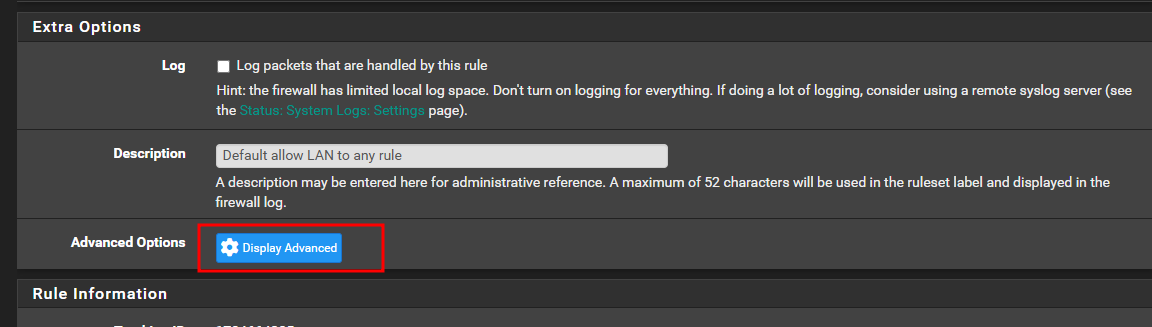

Handle the IPv6 Default Allow Rule (Similar Pattern)
On the same VLAN rules page, locate the Default allow VLAN IPv6 to any rule. At this point, you have two options:
- Disable it entirely by clicking the checkmark (if you do not want IPv6 on this VLAN outside the VPN tunnel)
- Edit it and assign GW_PROTONVPN_V6 as the gateway (to route IPv6 through the VPN as well — recommended for a leak-free dual-stack setup)
Step 9 — DNS Configuration (No-Leak Setup via DHCP)
Rather than configuring system-wide DNS to go through the VPN — which would affect all interfaces — this setup instead uses DHCP to push specific DNS servers directly to VLAN clients. As a result, DNS requests from those clients stay inside the VPN tunnel, and your setup avoids any DNS leaks.
DHCP Server — Push VPN DNS to VLAN Clients
Go to Services → DHCP Server → [Your VLAN interface]. Under Servers, configure the DNS servers as follows:
| DNS Setting | Value |
| DNS Server tunnel 1 (IPv4) | 10.2.0.1 |
| DNS Server tunnel 2 (IPv4) | 10.3.0.1 |
| DNS Server tunnel 1 (IPv6 — in DHCPv6) | 2a07:b944::2:1 |
| DNS Server tunnel 2 (IPv6 — in DHCPv6) | 2a07:b944::3:1 |
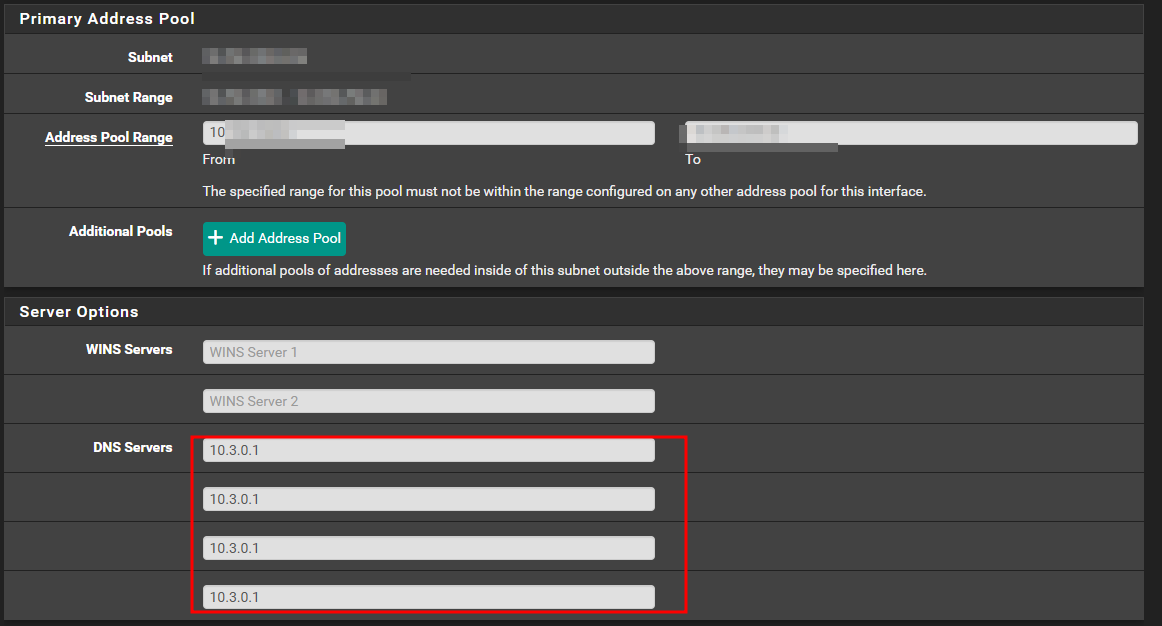
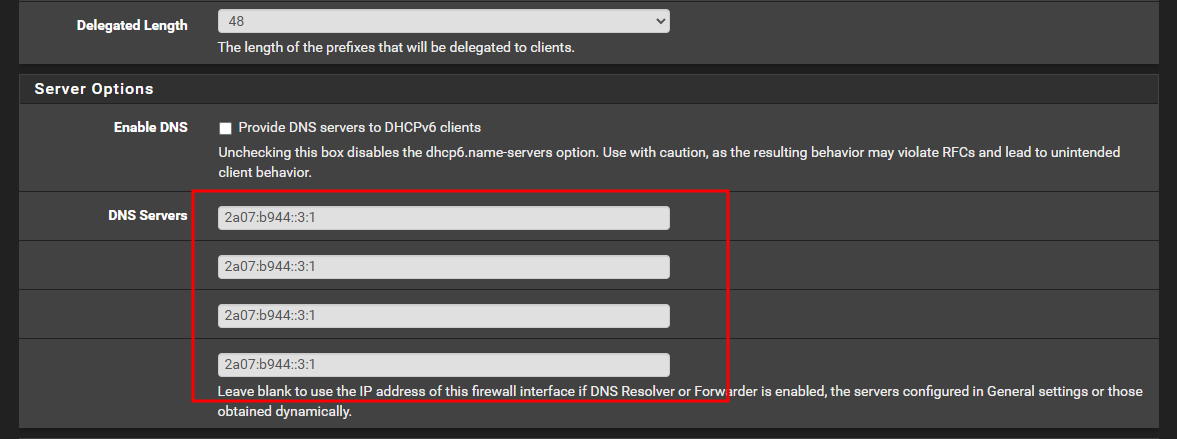
These addresses are Proton VPN's internal DNS resolvers, which clients can only reach through the tunnel. Consequently, clients receive these via DHCP and use them for all DNS queries, which travel through the WireGuard tunnel and resolve on Proton's infrastructure — completely bypassing your ISP or internal DNS.
Allow DNS Access in VLAN Firewall Rules
For the DNS servers above to be reachable from the VLAN, you also need firewall rules that permit access to those addresses. Add rules on your VLAN interface to allow:
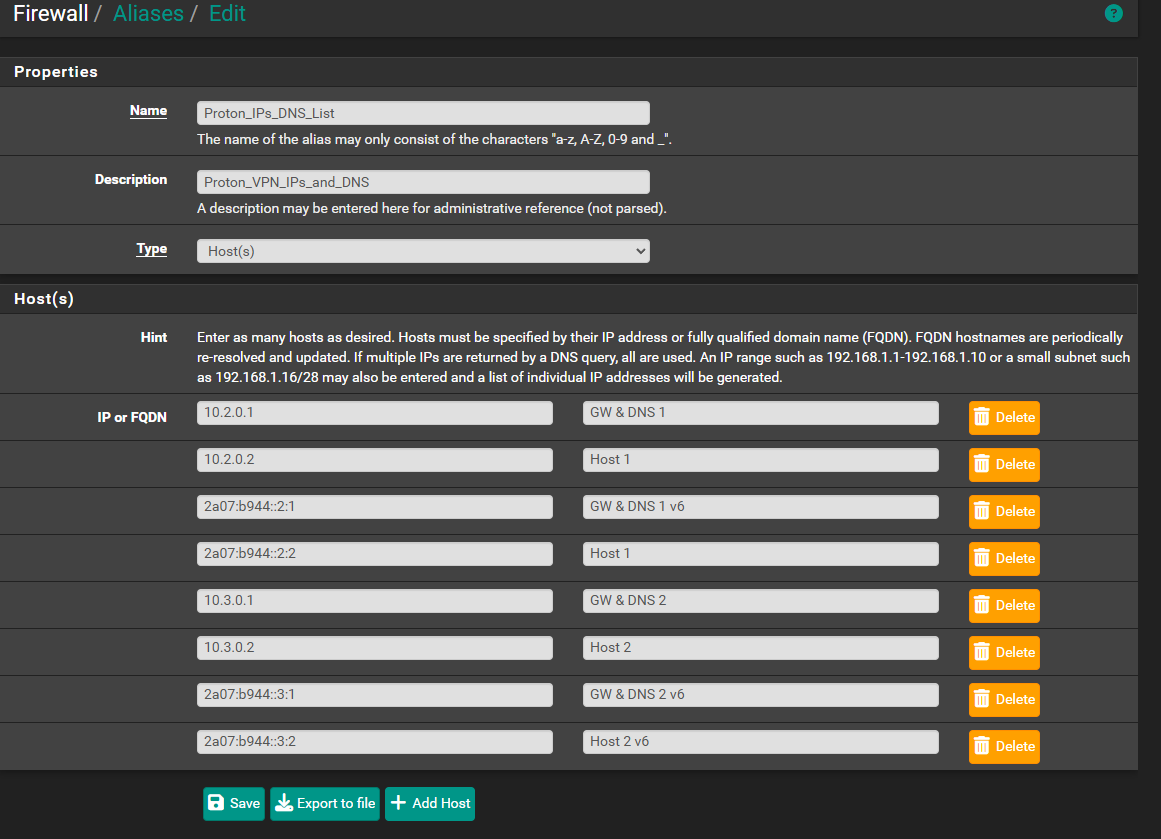
Add a allows rules for the in that particular network to allow to access to the Proton VPN IPs, add a rule on the top and then arrange as needed:
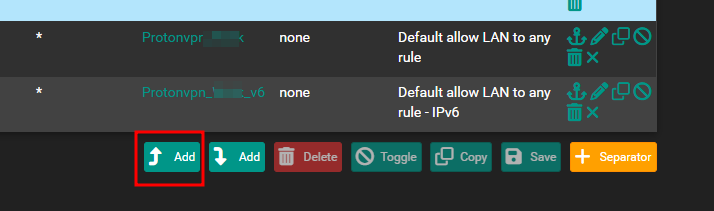
- Action: Pass, Address Family: IPv4+IPv6, Protocol: Any, Destination: [Alias-a list of IPs].
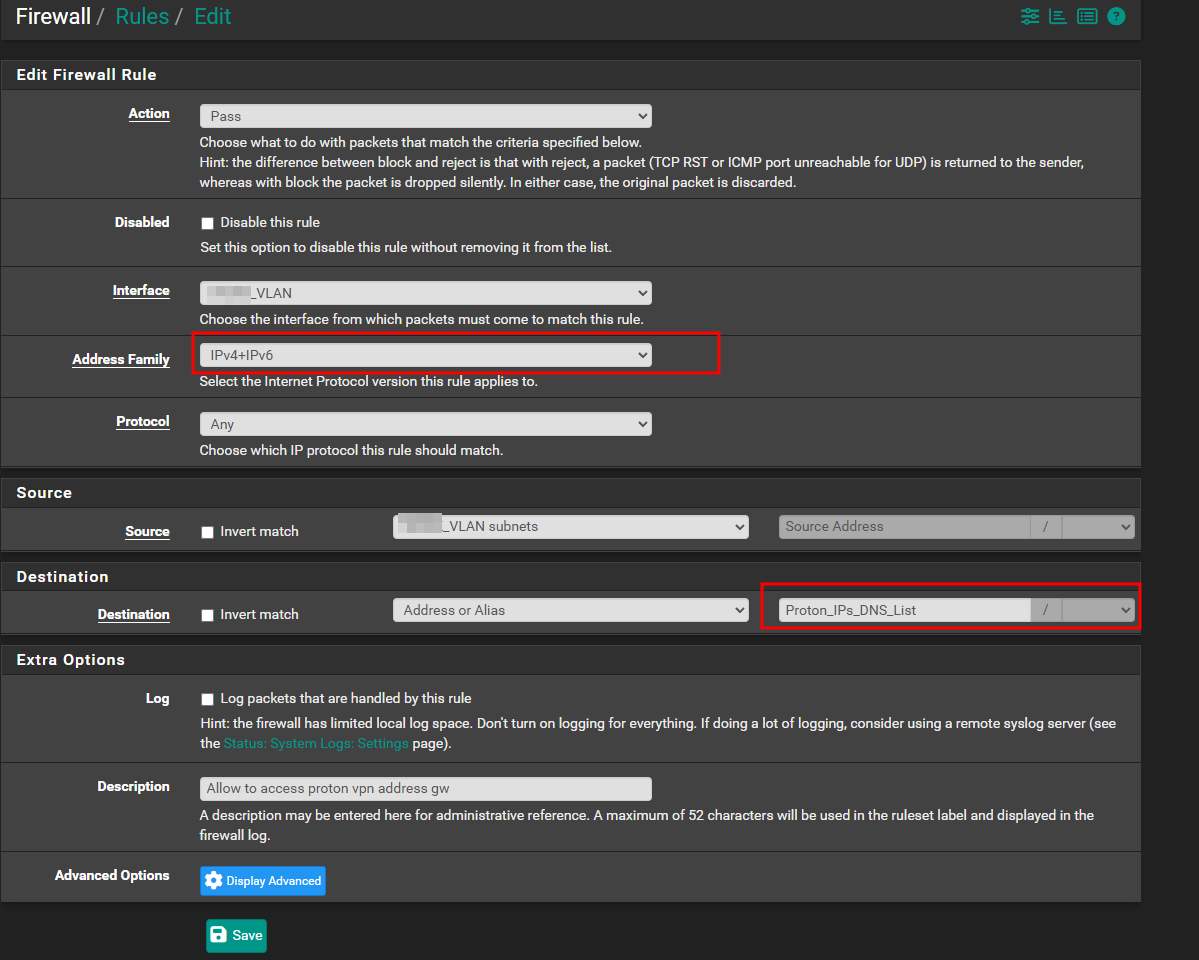
For the reference, here is my list for VPN addresses, Since I am using multiple tunnel, I have include multiple addresses, but feel free to customize it for you need:
Step 10 — IPv6 ULA and Dual-Stack Notes
Your internal network already uses a ULA (Unique Local Address) IPv6 prefix for LAN/VLAN addressing — specifically the fd::/8 range on your pfSense interfaces. In addition to that, the WireGuard VPN attaches a separate global unicast IPv6 address (2a07:b944::2:2/128) to the tunnel interface.
The dual-stack IPv6 setup through Proton VPN's WireGuard follows the same conceptual structure as the IPv4 setup in all previous steps. Specifically:
- Tunnel interface address: 2a07:b944::2:2/128
- Gateway: 2a07:b944::2:1
- Allowed IPs on peer: ::/0 (routes all IPv6 through the tunnel)
- NAT6 rules: source = your VLAN ULA prefix, interface = OPT_VPN, translation = interface address
- DHCPv6 DNS: 2a07:b944::2:1 and 2a07:b944::2:2
- Firewall rules: assign GW_PROTONVPN_V6 as gateway on the VLAN IPv6 allow rule
Because your ULA IPv6 prefix already sits on your VLAN interfaces and DHCP handles IPv6 address assignment, you need no additional DNS or address configuration at the pfSense system level for the VPN side. Instead, the gateway and NAT rules handle everything automatically once the WireGuard tunnel comes up.
Step 11 — Scaling to Multiple VLAN Tunnels
One of the most common questions when setting up policy-based routing is how to run multiple independent WireGuard tunnels for different VLANs — for example, routing one VLAN through a UK server and another through a US server.
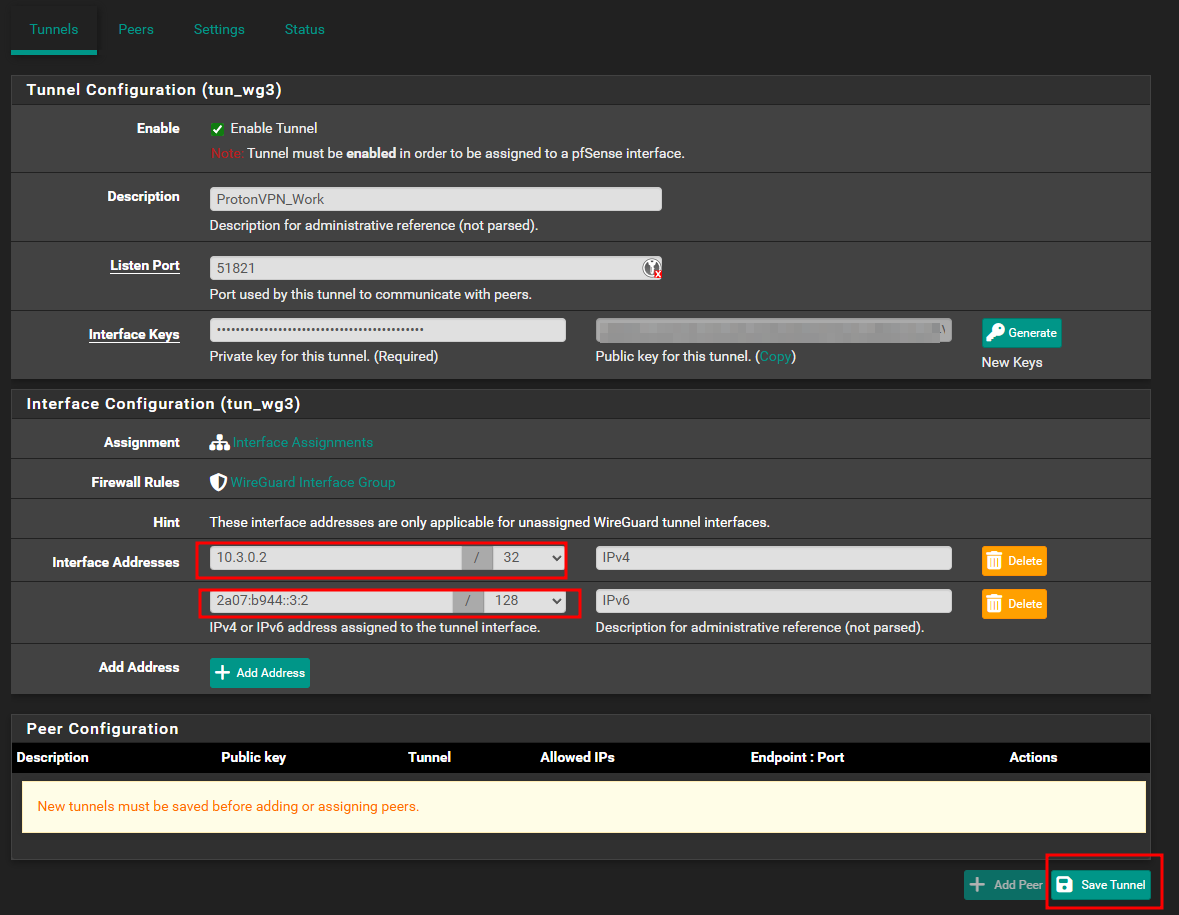
Fortunately, Proton VPN's WireGuard implementation supports this cleanly. Each additional tunnel simply increments the IP address scheme by one:
| Tunnel / VLAN | IPv4 Client | IPv4 GW/DNS | IPv6 Client | IPv6 GW/DNS |
| Tunnel 1 (first VLAN) | 10.2.0.2/32 | 10.2.0.1 | 2a07:b944::2:2/128 | 2a07:b944::2:1 |
| Tunnel 2 (second VLAN) | 10.3.0.2/32 | 10.3.0.1 | 2a07:b944::3:2/128 | 2a07:b944::3:1 |
| Tunnel 3 (third VLAN) | 10.4.0.2/32 | 10.4.0.1 | 2a07:b944::4:2/128 | 2a07:b944::4:1 |
For each additional tunnel, repeat Steps 3 through 9 using the incremented IP scheme above. Moreover, keep the following points in mind:
- Each tunnel requires a separate WireGuard configuration file from Proton VPN (each file carries its own private/public key pair)
- Each tunnel gets its own pfSense interface assignment (OPT2, OPT3, etc.)
- Each tunnel gets its own IPv4 and IPv6 gateway entries
- The VLAN firewall rules point to the specific gateway for that VLAN
- Do NOT edit the Listen Port as 51820 for every tunnel, left as empty; we are setting up a server side, pfSense handles the demultiplexing automatically
Step 12 — Verification
After completing all the steps above, verify that traffic flows correctly through the VPN tunnel.
Check WireGuard Tunnel Status
First, go to VPN → WireGuard → Status. You should see the tunnel listed with a Latest Handshake timestamp that is recent (within the last few minutes). If no handshake has occurred, then the tunnel is not connected.
Check Gateway Status
Next, go to System → Routing → Gateways. Both GW_PROTONVPN (IPv4) and GW_PROTONVPN_V6 (IPv6) should show a green Online status. If either shows as Unknown or Down, refer to the troubleshooting section below.
Test from a Client on the VPN VLAN
From a device on the VLAN that you configured for VPN routing, visit a site like https://ipleak.net or Proton VPN's own IP check. The displayed IP should be the Proton VPN server's address, not your ISP's. Similarly, the DNS section should show Proton's DNS resolvers, not your ISP's.
Test IPv6
Finally, from the same client, visit test-ipv6.com. You should see an IPv6 address from Proton VPN's range (starting with 2a07:b944 or a similar Datacamp/Proton ASN prefix), not your ISP's IPv6 prefix.
Troubleshooting
Gateway Shows as Unknown or Offline After All Configuration
This is a common issue. By default, pfSense monitors gateways by sending ICMP pings to the gateway IP. However, WireGuard tunnels do not always respond to pings, so pfSense marks the gateway as offline even though the tunnel actually works.
To resolve this, go to System → Routing → Gateways and edit your VPN gateway (GW_PROTONVPN and/or GW_PROTONVPN_V6). Click Display Advanced, then check Disable Gateway Monitoring. After you save and apply changes, the gateway shows as Online and traffic routes through it correctly.
Tunnel Connects But No Traffic Flows
First, check that the Allowed IPs on the peer includes 0.0.0.0/0 (and ::/0 for IPv6). Next, verify that the Manual Outbound NAT rules point the interface to OPT_VPN. Also confirm that the VLAN firewall rule carries the gateway override and that the non-local gateway option is active on the gateway config.
IPv6 Not Working Through the Tunnel
Start by ensuring you added ::/0 to the peer's Allowed IPs. Then verify that GW_PROTONVPN_V6 exists and shows as active. Next, check that the IPv6 Manual NAT rules cover your VLAN's ULA prefix, and confirm that the VLAN firewall IPv6 allow rule carries GW_PROTONVPN_V6 as its gateway. Finally, remember that IPv6 NAT rules must be added separately — they do not inherit from IPv4 rules.
DNS Leaks Detected
If a DNS leak test shows your ISP's DNS servers, then VLAN clients are not using the Proton DNS that DHCP pushed. First, check that the DHCP server for the VLAN lists 10.2.0.1/10.2.0.2 and 2a07:b944::2:1/2a07:b944::2:2 as DNS servers. Then ensure firewall rules let the VLAN reach those addresses on port 53. Finally, verify that no other DNS override exists that might redirect queries.
WireGuard Handshake Never Completes
First, verify the endpoint IP and port (51820) are correct. Then ensure your WAN firewall does not block outbound UDP on port 51820. Additionally, check that the private key in the tunnel config and the public key in the peer config both come from the same Proton VPN configuration file — mixing keys from different configs will always cause a failure.
Summary
This guide covered the complete end-to-end setup of Proton VPN WireGuard as a policy-based routing gateway in pfSense 2.7.x, including per-VLAN traffic control, dual IPv4/IPv6 tunneling, leak-proof DHCP-based DNS, and a scalable multi-tunnel architecture. The table below summarizes the key steps:
| Step | What was configured |
| 1 | WireGuard config file downloaded from Proton VPN (Router platform) |
| 2 | WireGuard package installed in pfSense Package Manager |
| 3 | WireGuard tunnel created with IPv4 (10.2.0.2/32) and IPv6 (2a07:b944::2:2/128) addresses |
| 4 | Peer added with server public key, endpoint IP:51820, AllowedIPs 0.0.0.0/0 and ::/0 |
| 5 | tun_wg3 assigned as a pfSense interface with static IPv4 and IPv6 |
| 6 | IPv4 gateway (10.2.0.1) and IPv6 gateway (2a07:b944::2:1) added with non-local route option |
| 7 | Manual Outbound NAT enabled; IPv4 and IPv6 NAT rules configured for VLAN subnets |
| 8 | VLAN firewall rules updated with VPN gateway override for policy-based routing |
| 9 | DHCP pushes Proton DNS (10.2.0.1, 10.2.0.2, 2a07:b944::2:1, 2a07:b944::2:2) to VLAN clients |
| 10 | IPv6 dual-stack confirmed working via ULA local addresses + Proton GUA tunnel address |
| 11 | Multiple tunnels scaled by incrementing IP scheme (10.3.x, 10.4.x, 2a07:b944::3:x...) |
| 12 | Verification and troubleshooting steps, including disabling gateway monitoring |
Note: WireGuard® is a registered trademark of Jason A. Donenfeld.
Comments NOTHING