



Introduction
Managing disk partitions in Linux efficiently is a crucial task to a Linux administrator, especially when dealing with multiple storage devices. One of the most reliable ways to mount partitions is by using the UUID (Universally Unique Identifier) instead of traditional device names like /dev/sda1. UUIDs provide a more stable reference since device names can change after reboots, UUIDs are symbolic links that point to actual block devices within the /dev directory, making UUID-based mounting essential for persistent configurations. In this article I will show you exactly how to mount disk partitions to Linux system by using UUID method.
1. Identify the Partition You Want to Mount
sudo blkid
sudo blkid /dev/sdaX
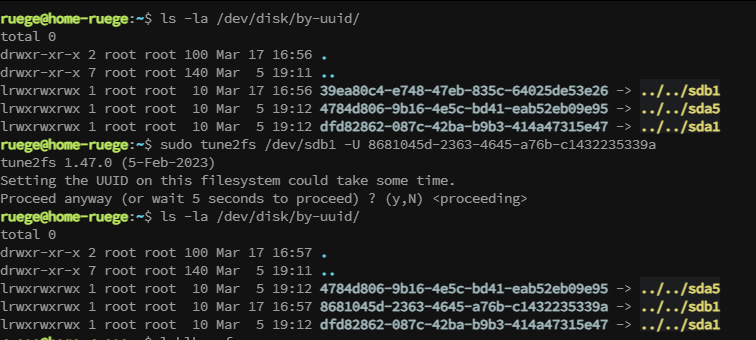
ls -la /dev/disk/by-uuid/
Copy Partition UUID that we want to mount; in my case, it was 8681045d-2363-4645-a76b-c1432235339a
[optional]: After you have identified partitions, also check the filesystem on the disk or partition to ensure its integrity before continuing is recommended. (Especially for the new disk that has no data )
sdb1 is an example:
sudo e2fsck -f /dev/sdb1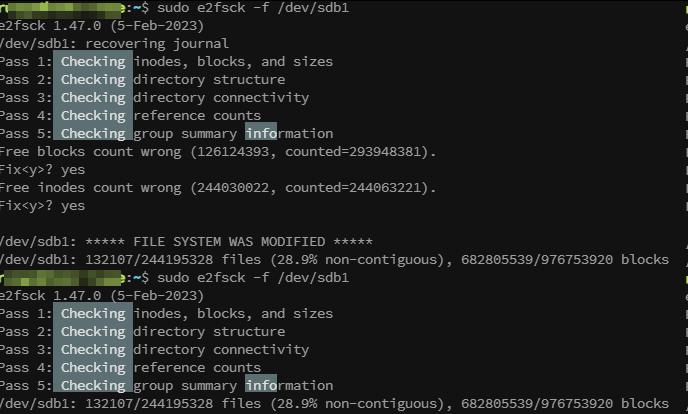
As you can see I got some error that I need to fix.
2. Creating the Mount Point and its Permissions
Creating a mounting point:
In this example, I will create a directory under /mnt call CCTV1:
sudo mkdir -p /mnt/CCTV1Understand the directory permission:
Once the partition is mounted, ensuring the correct ownership and permissions is crucial, especially if a non-root user needs write access. By default, /etc/fstab mounts file systems with root ownership, meaning regular users cannot modify files within the mount point.
To grant a specific user ownership of the mounted directory, use:
chown -R username /mnt/mount_point
Replace username with the actual user’s name and /mnt/mount_point with the path where the partition is mounted.
If you also need to assign group ownership, use:
chown -R username:groupname /mnt/mount_point
For additional flexibility, modify permissions using chmod. If the group needs write access while keeping no permissions for others, apply:
chmod -R 770 /mnt/mount_point
This configuration ensures:
- The owner (
username) has full access. - The group (
groupname) can read, write, and execute. - Other users cannot access.
If you want non-root users to mount the partition manually when unmounted, you can add the user option in /etc/fstab. However, this only allows mounting; it does not change directory permissions, which still require chown and chmod adjustments.
By setting ownership and permissions correctly, users can seamlessly access and modify files within the mounted partition.
Recommended Approach: Using a Group for Permissions:
Using a common group (a dedicated system group) is a better and more scalable approach, especially if multiple users need access to the mounted partition. This method maintains root ownership while allowing specific users to gain write access by being part of the group, and also ensures better manageability.
Create a dedicated group (e.g., storage or data):
sudo groupadd storage
Change Group Ownership of the Mount Point, assign the mount point’s ownership to the new group while keeping root as the owner:
sudo chown -R root:storage /mnt/mount_pointSet Group Permissions, give the group read, write, and execute permissions:
sudo chmod -R 770 /mnt/mount_pointAdd Users to the Group, any user who needs access should be added to the storage group:
sudo usermod -aG storage username
***Ensure Group Permissions Persist After Reboot, modify /etc/fstab to include the gid option: (see the next section for the more mounting explanation)
UUID=your-uuid /mnt/mount_point ntfs defaults,errors=remount-ro,noatime,lazytime,nofail,uid=0,gid=1001,umask=007 0 2- Replace
your-uuidwith the actual UUID. - Use
id -u rootto get the user ID(UID), should be 0. - Use
getent group storageto get the group ID (GID), such as 1001. - The
umask=002ensures the group has write permissions by default.
3. Editing the fstab File
The /etc/fstab (File System Table) file is essential in Linux for managing disk partitions and ensuring they are automatically mounted at boot. Instead of manually mounting partitions every time the system starts, /etc/fstab provides a way to define persistent mount points.
Edit the fstab file:
Open the /etc/fstab file in a text editor:
sudo nano /etc/fstabUsing the following format: UUID={YOUR-UUID} {/path/to/mount/point} {file-system-type} defaults,errors=remount-ro 0 2 to add a new line, make sure each parameter is separated by spaces or a tap, example:
UUID=8681045d-2363-4645-a76b-c1432235339a /mnt/CCTV1 ext4 defaults,errors=remount-ro,noatime,lazytime,nofail 0 2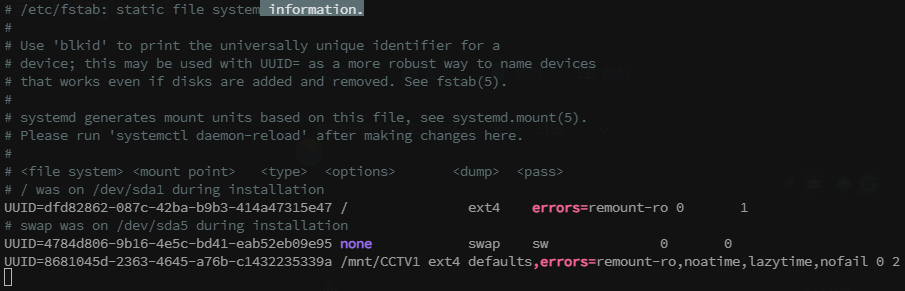
Mount option example:
You notice I had added a few options to the mount, other than the default option, many other parameter optional.
The defaults (Standard Mount Options) is equivalent to:
rw→ Read/write accesssuid→ Allow setuid bits for privilege escalationdev→ Allow device filesexec→ Allow execution of binariesauto→ Mount automatically at boot (opposite ofnoauto)nouser→ Only root can mountasync→ Enables asynchronous I/O operations
Some other option you may include:
lazytime: Updates timestamps (atime, mtime, ctime) in memory but delays disk writes. Syncs changes only when necessary (e.g., unmounting, fsync() calls, or after a long delay).
nofail (Do Not Fail on Boot): If the disk or partition fails to mount, the system does not halt the boot process. Useful for external drives or network mounts that may not always be available. Without this, a missing drive could cause the system to drop into emergency mode.
x-systemd.automount (Systemd Auto-Mount on Demand) : Automatically mounts the partition when accessed, rather than at boot. Reduces boot time and improves system responsiveness, especially for network or slow disks. Works well with noauto by keeping the system clean until the filesystem is actually needed.
Refer to the reference section for more switch option!
Saving and apply the changes:
After finishing adding the desired mount point and option to the fstab file, then apply changes without rebooting:
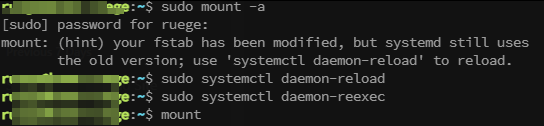
sudo mount -aThis command mounts all filesystems listed in the /etc/fstab file, it also including the one you just added.
sudo systemctl daemon-reload may need to taking effect:
Comments NOTHING