



Introduction
When it comes to upgrading or reinstalling workstations, maintaining the intricate configurations of numerous print drivers is paramount. Thankfully, the Windows PRINTBRM Migration tool offers a seamless solution. It ensures that all printer configurations, including queues, configured ports, and drivers, remain intact throughout the process, it exports all the printer configurations as a ".printerExport" file. With this tool, you can confidently proceed with system upgrades or reinstalls without the fear of losing critical printer settings.
Prerequisites
- Require administrator privilege to run the tool.
- This tutorial is tested on Windows 7, Windows 8/8.1, Windows 10, and 11, other version of Windows is not tested, so please test it on your own.
- Please note that the 32-bit and 64-bit versions of Windows have different driver files that are not compatible with each other, unless you have multiple drivers installed.
- The PrintBrmUi.exe tool is not available on Windows 10 Home Edition. As a workaround, you will need to download the portable file: 64-bit OS and 32-bit OS. (Use it as a GUI program only, the command line instructions below do not apply)
Procedure
The following are several methods to do so:
Method 1 - Command Line:
For both procedures: Open Command Prompt: then right-click on Command Prompt and select "Run as administrator" to open an elevated Command Prompt window.
Backup Procedure: In the Command Prompt window, type the following command and press Enter:
%windir%\System32\Spool\Tools\PrintBRM -B -S <ServerName> -F <BackupFilePath\filename.printerExport>Replace <ServerName> with the name of the print server you want to back up (can be left it blank if is on the local server) and <BackupFilePath\filename.printerExport> with the desired file path for the backup.
Depending on the number of printers and the size of the configuration, the backup process may take some time. Wait until the process completes successfully, it will tell you that on the screen.
Restore Procedure: In the Command Prompt window, type the following command and press Enter:
%windir%\System32\Spool\Tools\PrintBRM -R -S <ServerName> -F <BackupFilePath\filename.printerExport>Replace <ServerName> with the name of the print server you want to back up (can be left it blank if is on the local server) and <BackupFilePath\filename.printerExport> with the desired file path for the backup.
For more backup and restore options and help:
%windir%\System32\Spool\Tools\PrintBRM /?Or visit the Microsoft Docs site
Method 2 - GUI
For both procedures: Open Command Prompt or PowerShell: then right-click on it and select "Run as administrator" to open an elevated window, type PrintBrmUi.exe, the 'Printer Migration' wizard will launch.
Backup Procedure:
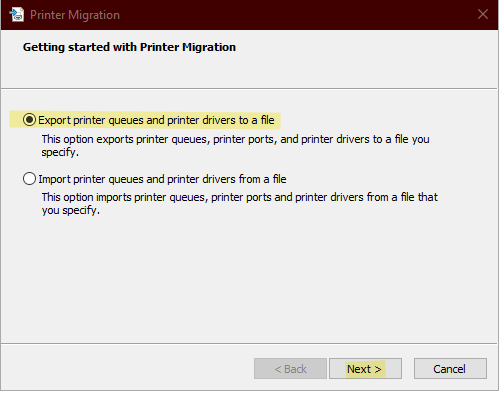
Click "Next" to proceed and finish the rest of the options to complete the backup.
Restore Procedure:

Click "Next" to proceed and finish the rest of the options. In the select import options, choose whether to keep existing printers or override existing printers. Select the desired option and click "Next".
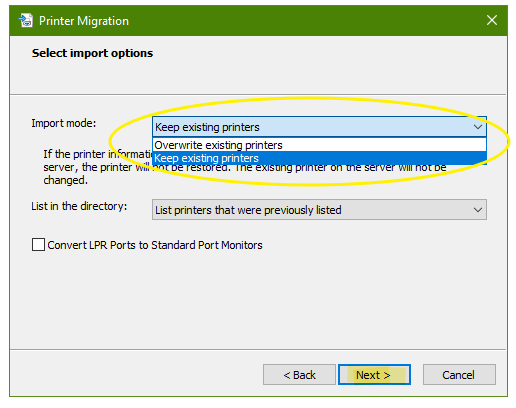
Review the summary of restore options. Click "Back" to make changes or "Finish" to start the restore process.
Method 3 - Print Management MMC
If you have the professional version of Windows, you can always use printmanagement.msc tools to backup and restore; Which launch the same PrintBrmUi.exe as the GUI shows.

There you have it! PRINTBRM makes it easy to backup and restore printers in Windows. It's a handy tool that saves time and hassle for administrators, ensuring printing keeps running smoothly without any interruptions.
Comments NOTHING